
Chapter 7 Sharing Your Shiny App
This chapter introduces different ways of sharing your Shiny application code with a wider audience starting with simply sending the code files to publishing to the shinyapps.io platform.
If you wish to explore more advanced options of sharing your Shiny apps, which includes potential cost savings, proceed to Chapter 8.
Once you have developed your Shiny app, you can distribute your code or deploy your code depending on your intended audience.
Distributing code involves sharing your Shiny source code so that it can run on different computer other than your own computer. This approach is more suited for other developers or technical users who are familiar with setting up and running a Shiny app project.
Deploying code involves hosting your code on a server so that users can access your Shiny app without any setup. This approach is ideal for non-technical users as all they need to do is enter a website address in their web browser.
7.1 Distributing Code
Distributing the source code of a Shiny app allows collaborators, clients, and users to run it on their own machines, if they are savvy enough. When the audiences of a Shiny app are R or Python users, it makes sense to share the app as a Gist, a GitHub repository, or a zip file. However, sharing Shiny apps this way leaves installing dependencies up to the user.
A Gist is a service provided by GitHub to share code snippets. It is version controlled and tracks changes made to code snippets. You can think of a Gist as a virtual notebook for code which is ideal for small Shiny apps that do not rely on large sets of data.
In comparison, a GitHub repository is a full fledged source code management system. Its underlying technology, Git, allows for multiple versions of source code to be tracked in a central location. Many Shiny apps are hosted on GitHub or other similar services (like GitLab or Bitbucket), and GitHub also offers other useful features that developers rely on. Such as issues, pull requests, continuous integration and deployment (CICD) through GitHub Actions. If your GitHub repository is private, the users of the app will have to have their own GitHub account so that you can share the repository with them without making it public.
A zip file is compressed archive that bundles folders and files into a single file. By “zipping” up your source code to a single file, you can easily distribute your file via email, a download link, or even physical media like a USB drive or CD-ROM. This approach, however, will make it harder to trace changes and maintain different versions compared to approaches listed previously.
The shiny R package comes with a few useful functions that makes sharing
your apps with technical users easier. You can use the runUrl(),
runGitHub(), and runGist() functions to run apps from specific URLs,
GitHub repositories, and Gists, respectively. runUrl() can be pointed at
R files or compressed files, such as .zip.
Another option is distributing your R Shiny app as an R package. This option takes care of dependency management. You can install the R package from different sources, like GitHub, and you can also have it hosted on CRAN. However, the recipients will have to be able to install the package, which implies familiarity with R and package management. Sharing the app source code is a low effort option on your part, but might be a high effort option for the ones you are sharing your app with.
Since sharing the source code can be cumbersome for non-technical recipients, it is ideal to share a deployed version of your Shiny application accessible through a web browser. In the remainder of the book, we’ll guide you through the process of deploying Shiny apps. The content is structured to gradually introduce simpler solutions, progressing to more advanced solutions.
7.2 Deploying Shiny Apps
Shiny applications can be deployed in two ways. Shinylive runs entirely in the browser, allowing a Shiny app to function without a backend server for any application logic. Shinylive can run on any static site hosting service such as GitHub Pages or even straight from the shinylive.io editors for R and Python.
In contrast, classic Shiny provides a fully reactive experience by connecting to a backend server to handle application logic. Shiny deployments can run on your self-hosted server, or on a cloud-based platform provided by a third party, such as shinyapps.io.
The next sections introduce how to deploy Shiny apps in the simplest ways possible.
7.2.1 shinyapps.io
shinyapps.io offers a dedicated Shiny hosting service to share your application through a web browser. It is a Platform as a Service (PaaS) tailored for Shiny apps and is provided by Posit PBC. It is a fully managed solution (no server maintenance costs, only service costs) and is tightly integrated with the RStudio IDE for R Shiny apps. R and Python based Shiny apps can also be published from the command line. Apps are self-contained and isolated from each other. Connections are encrypted (HTTPS) by default.
To begin you must sign up by visiting https://shinyapps.io. After sign-up, you will be prompted to set your account name as seen in Figure 7.1.

Figure 7.1: Account name setup screen after sign up.
Your account name is used to access any published apps from the
https://<account-name>.shinyapps.io web address.
Now that your account has been set up, let us explain how to deploy from the RStudio IDE for Shiny R apps and deploy from the command line for Shiny Python and R apps.
R: Deploying from RStudio IDE
If you develop a Shiny app with R, you can deploy your app straight from the RStudio Desktop IDE with the click of a button.
To be able to take advantage of push-button publishing, you will need the following prerequisites:
- Install a recent version of RStudio Desktop,
- Install R and the
rsconnectR package, e.g. viainstall.packages("rsconnect").
Following the installation of R and RStudio, access the tokens page on shinyapps.io by clicking on your profile picture and selecting “Tokens” as seen in Figure 7.2.

Figure 7.2: shinyapps.io tokens page.
On the tokens page, click the “Show” button and you will be presented instructions on how to connect with R. Simply click the copy button, and paste the command into the R console in RStudio.
Once connected, you can publish your app by clicking the publish button seen in Figure 7.3. You will see the publish button after opening a R source code file.

Figure 7.3: RStudio IDE Shiny publish button.
Next, you must select the account you wish to deploy to if you set up multiple accounts, name the app (here we use ‘hello’), and select what files to deploy as part of the app. An example of this can be seen in Figure 7.4.

Figure 7.4: RStudio IDE shinyapps.io publish screen.
Finally, once you click publish, wait until the deployment is complete, you can follow the process in the Deploy pane of RStudio IDE (Figure 7.5).
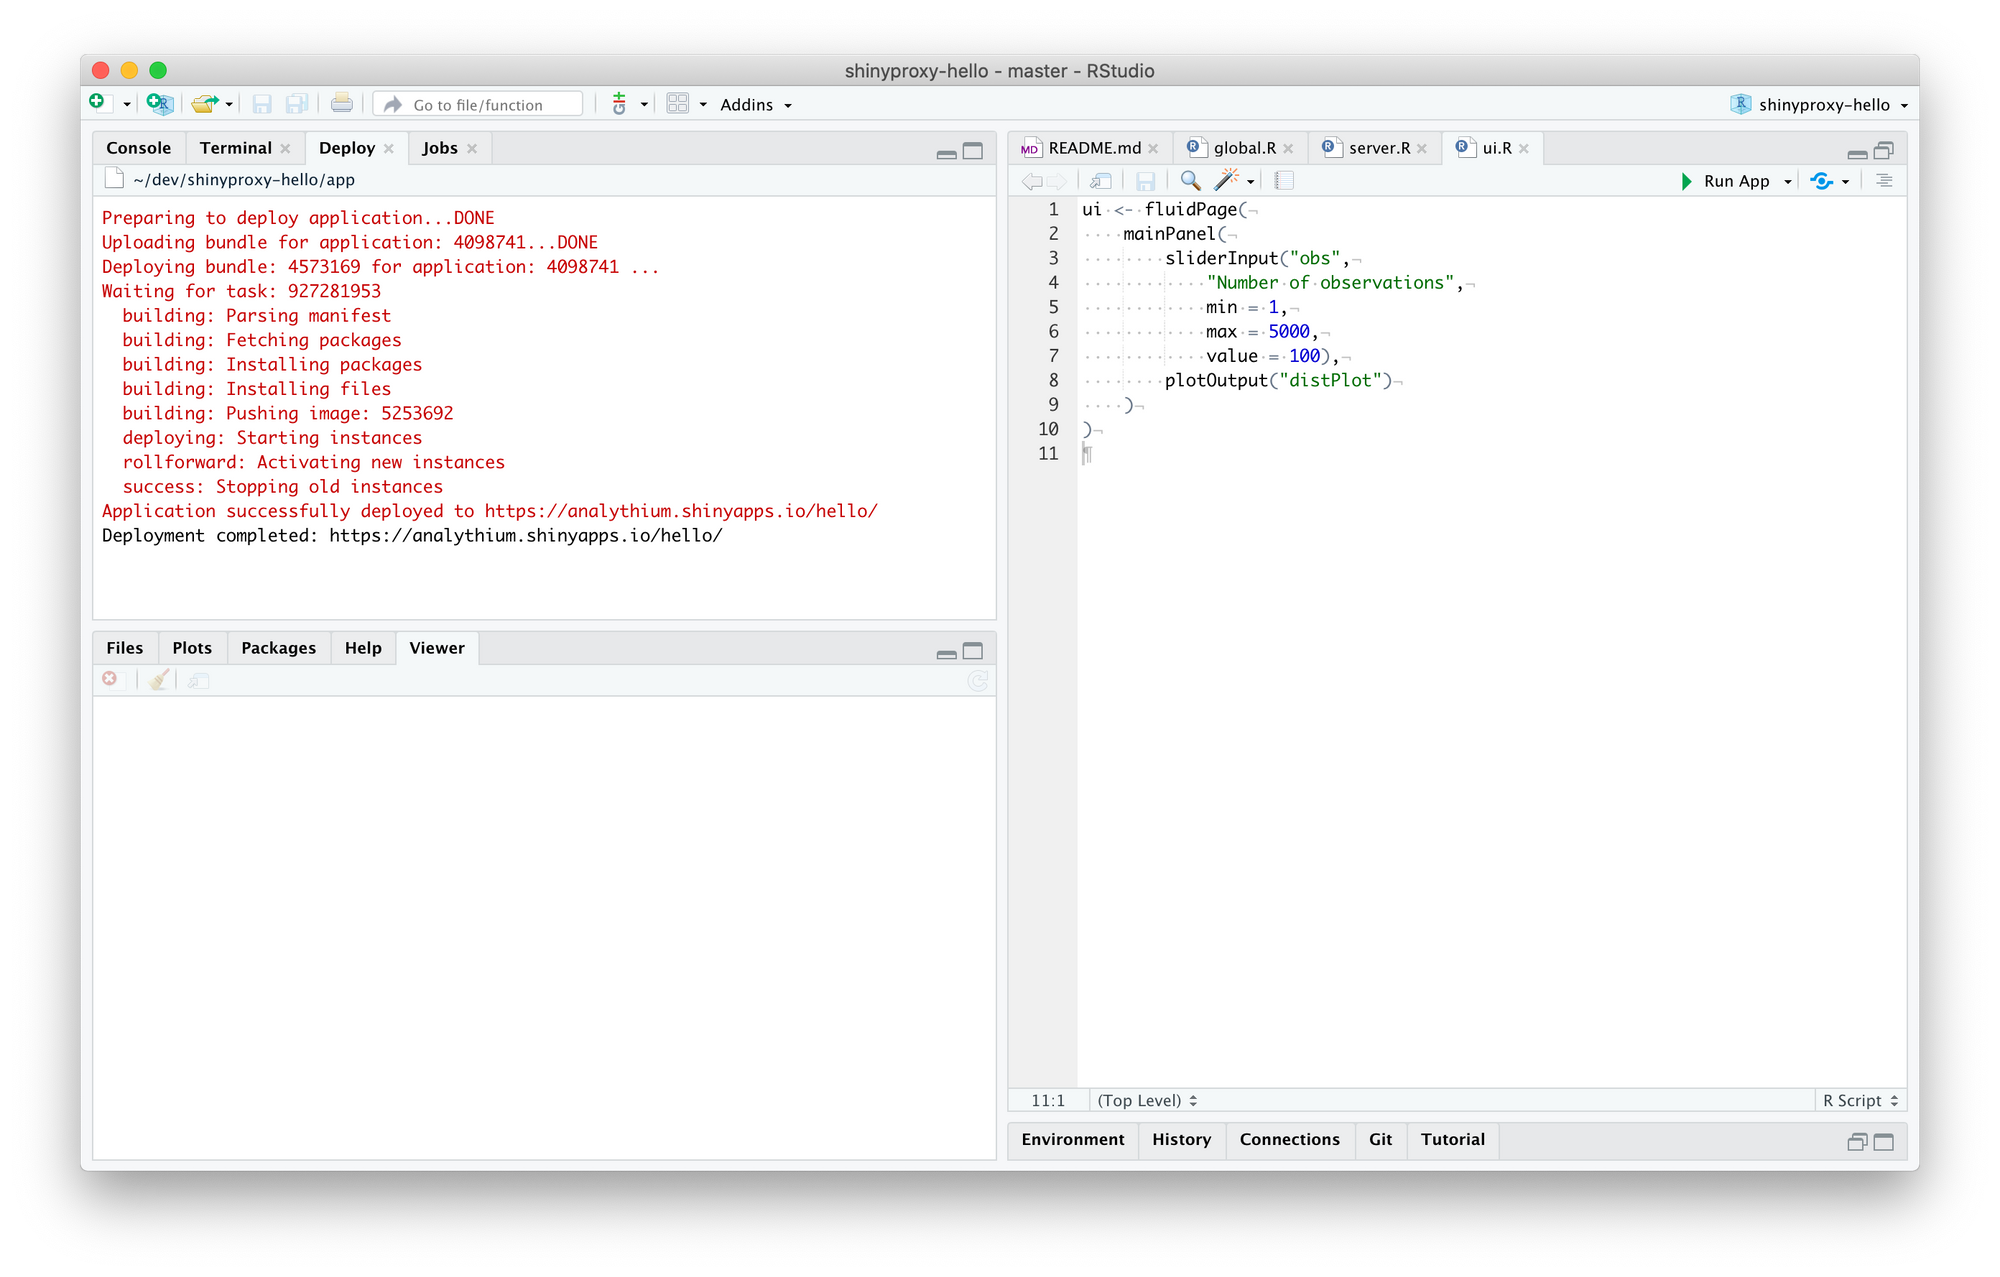
Figure 7.5: RStudio IDE deploy pane.
The browser will be launched with the new deployment by default, check
that everything works as expected.
Your newly deployed app will be available at
https://<account-name>.shinyapps.io/<app-name>.
The dashboard in your shinyapps.io account will list your app similar to Figure 7.6.
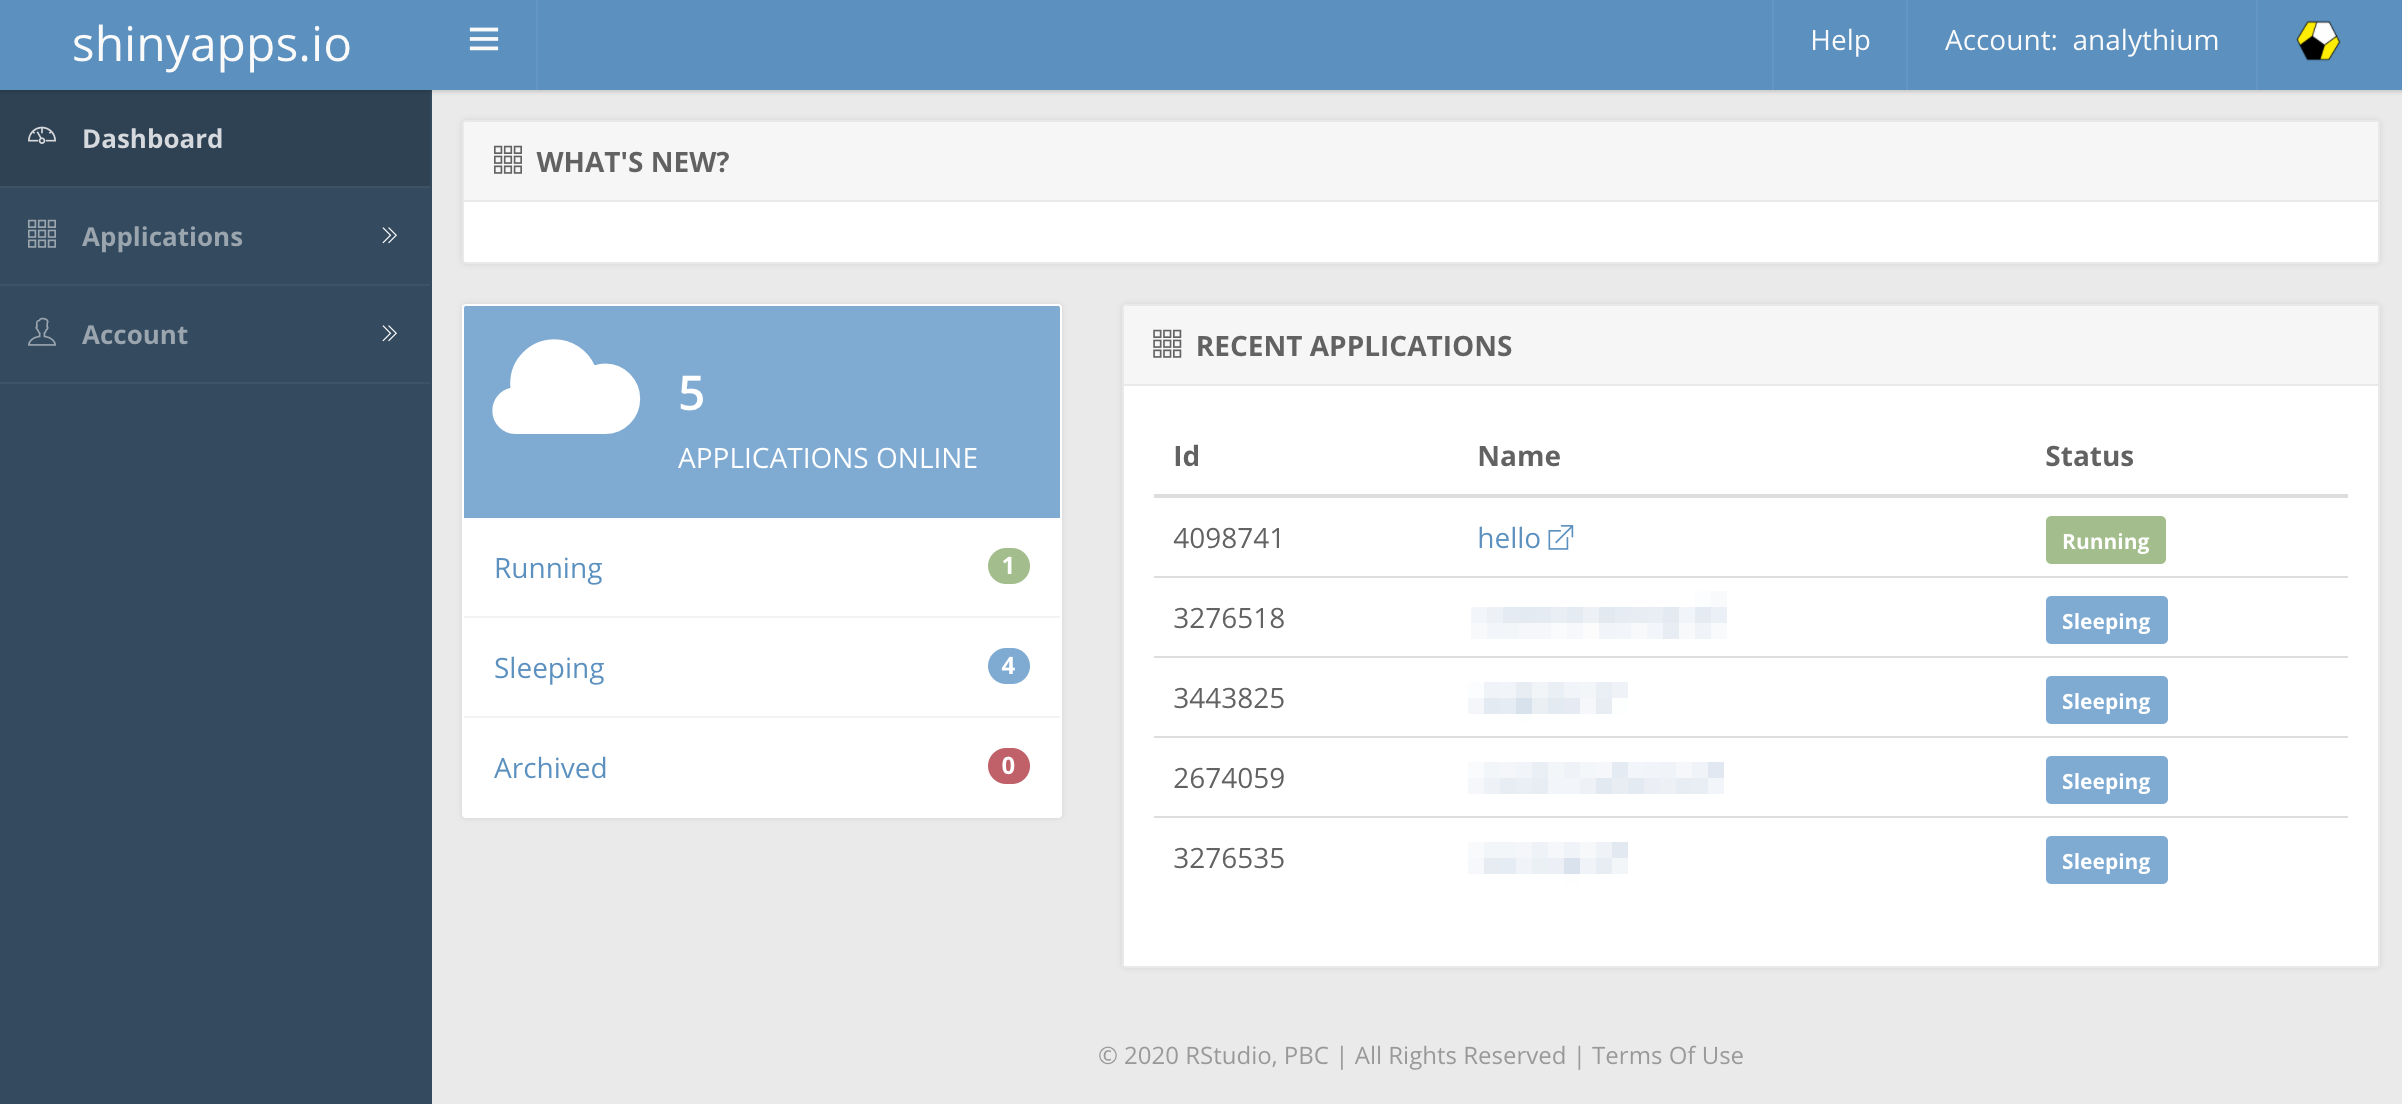
Figure 7.6: shinyapps.io app dashboard
R + Python: Deploying from Command Line
Deployment from the command line is supported for R and Python Shiny apps.
Both options require the installation of a rsconnect library
to connect with shinyapps.io via a token and a secret.
To get connected with the token and secret, you will need to access the tokens page on shinyapps.io. First, log in to the shinyapps.io dashboard, click on your profile picture, and select “Tokens”, as shown in Figure 7.2. You should already have a token listed in the table. Click “Show” to reveal the command needed to authenticate with R or Python and run it in the appropriate console.
R
To deploy your Shiny app in R, first install the rsconnect package
if you haven’t already in the R console:
Copy the authentication command from the shinyapps.io “Tokens” page and run it in your R console. It should look like this:
rsconnect::setAccountInfo(
    name = "<account-name>",
    token = "<token-value>",
    secret = "<SECRET>")

# example
rsconnect::setAccountInfo(
    name = "h10y",
    token = "A1B2...Y8Z9",
    secret = "abc123...xyz789")
Once authenticated, deploy your app with:
rsconnect::deployApp(
    appDir = "/path/to/your/app",
    account = "<account-name>",
    appName = "<app-name>")

# example
rsconnect::deployApp(
    appDir = "./r-shiny/app",
    account = "h10y",
    appName = "faithful-r")
The rsconnect package explores the app source files and creates a manifest
based on the local R version being used and the packages mentioned
as part of the app source files. rsconnect will also check dependencies
parsed by other packages, like packrat or renv.
You might see an error message telling you that your app library and
lockfile is out of sync.
You can either use renv::restore() or renv::snapshot() to synchronize
the packages, or add an .rscignore file to ignore the lock file.
Python
To deploy the Shiny app in Python, first install the
rsconnect-python library if you haven’t already
using the following command in your terminal:
Copy the connection command from the shinyapps.io “Tokens” page
and run it in your terminal. Use the add command to store information about
the server your are deploying to, so that you can deploy to the server later
without providing the credentials again. The --name option specifies
a “nickname” for the server that you can refer to when deploying apps later.
It should look like this:
rsconnect add \
    --account <account-name> \
    --name <NAME> \
    --token <token-value> \
    --secret <SECRET>

# example
rsconnect add \
    --account h10y \
    --name h10y \
    --token A1B2...Y8Z9 \
    --secret abc123...xyz789+
# Checking shinyapps.io credential...  [OK]
# Added shinyapps.io credential "h10y".
Note, that this command will save the token and secret used to authenticate with shinyapps.io into a file that is marked as accessible by the owner only. It is a plain text file and it is good to remember that it exists and take precautions to prevent unauthorized access.
Once authenticated, deploy your app by providing the NAME of the
server you set with the previous command and the app’s title. This
title will be the path following the shinyapps.io domain
(https://<account-name>.shinyapps.io/<app-name>):
rsconnect deploy shiny /path/to/your/app \
    --name <NAME> \
    --title <app-name>

# example
rsconnect deploy shiny ./py-shiny/app \
    --name h10y \
    --title faithful-py
# Validating server...    [OK]
# Validating app mode...  [OK]
# Making bundle ...       [OK]
# Deploying bundle ...
# Waiting for task: 1575868905
#   building - Processing bundle: 10720803
#   building - Installing files
#   building - Pushing image: 13166256
#   staging - Pushing image: 13166256
#   deploying - Pushing image: 13166256
#   deploying - Starting instances
# Task done: Stopping old instances
# Application successfully deployed to https://h10y.shinyapps.io/faithful-py/
#         [OK]
# Saving deployed information...  [OK]
# Verifying deployed content...   [OK]
Currently, shinyapps.io supports python 3.7 to 3.12, using the
most recent patch version of Python loaded on shinyapps.io.
Because the Python version is not part of the requirements.txt file,
the rsonnect library will guess the Python version to use based on the local
environment. You might see a warning related to this ambiguity when
running the rsonnect command.
You can consider specifying a Python version constraint via the
pyproject.toml, setup.cfg or .python-version files.
The pyproject.toml or setup.cfg can have the Python version requirement
added to the project section as:
If using the .python-version file, add one or multiple Python versions, e.g.:
3.10.67.2.2 Sharing Shinylive
In Chapter 5.4, we introduce the concept of Shinylive which allows a Shiny app to run entirely in a browser without the need for a server. The Shinylive editor makes it easy to share your Shinylive application straight from the browser.
However, it should be noted that libraries can be slow to load, hence Shinylive is mostly ideal for micro projects that need minimal libraries and simple calculations. Furthermore, Shinylive may not run in certain browsers and its performance depends on the internet connection and the computer you are loading the application on.
It should also be noted that the presented option in this section is not a true “deployment” of Shinylive as the code is fed to the Shinylive editor hosted by Posit. There are also the Shinylive libraries for R and Python that allow you to create files for static site hosting of Shinylive on your hosting service of choice without relying on the Shiylive editor. We explain more about the static site hosting of Shinylive in Chapter 10.
Shinylive Web Editor
Posit offers a hosted Shinylive editor in the browser for R and Python(Posit 2024). The R editor is available here: https://shinylive.io/r. The Python editor is available here: https://shinylive.io/py.
First, you will need to copy your code into the editor.
Once you have copied the code you can press Ctrl+Shift+Enter
to run the code, or press the play button in the editor
to make sure it runs properly. Next, to share your app you will need to press
the share button as seen in Figure 7.7.

Figure 7.7: Shinylive editor share link.
There are 2 options for sharing:
- the Editor URL option loads your app via the code editor,
- the Application URL option loads your app without the code editor, but there is an optional header that provides a link to the editor.
You can copy either of the URLs and share it with your intended recipient and ideally it should run if your recipients web browser supports WebAssembly.
The URLs returned by the editor create a hash of the code that is read by the web browser(Posit 2024). That means no code is ever sent to a server and your source code is never sent directly to anybody other than the recipient that you share the URL with.
Since the app source is completely encoded in a URL, it may not work if your application code is too large. This is so because there is a maximum length for URLs that varies by browser. To solve this issue, we recommend either deploying a full Shiny app to shinyapps.io or exporting your own Shinylive app which is described in Chapter 10.
7.3 Summary
We have reviewed options for sharing your app’s source code with others in Section 7.1. Sharing the app source code has several issues when you are sharing with non-technical users. First off, they will have to have an R or Python runtime environment. Second, they will have to have all the right dependencies installed, sometimes with specific versions of the libraries.
To make your Shiny app more accessible, we introduce how to publish your app to be accessible via a web browser with shinyapps.io. We also introduce the option to share your Shiny app with the Shinylive editor.
The options we have introduced to share your Shiny app are just the tip of the iceberg, in the next part of this book, we will delve into more considerations for hosting you Shiny app including costs, branding, and security.