
Chapter 6 Containerizing Shiny Apps
Containerization is a topic that is of increasing interest to data scientists and is a key feature for being able to cover the R and Python aspects of Shiny hosting in parallel. Once the container image is built, deployment and hosting become independent of the language that the app was written in. Tooling around this task has made huge advances over the past two years, and thanks to this, the topic is now accessible to a wider audience.
Containerization enables you to separate your applications from your infrastructure so you can deliver software faster. Containerization help makes an application platform independent by creating virtual environments in a container. To run a specific application, you will need to develop an image for that platform which is then published on a container registry. The developed image can be pulled from the registry to run a virtualized container environment for the application.
Docker is one of the most popular tools for creating and managing containers for Shiny apps. This chapter will outline the needed concepts for containerizing your shiny application.
Learning Docker seems daunting at first, but it is an incredibly powerful piece of technology once you get the hang of it. It is also the building block of the modern web.
Docker is not the only tooling for containerizing applications. Docker’s licensing model has recently changed and can require a paid license for commercial use. Therefore, there are alternatives of the Docker Engine such as using Podman. However, Podman is much more technical to use than Docker.
All the general advantages of containerized applications apply to Shiny apps. Docker provides isolation to applications. Images are immutable: once build they cannot be changed, and if the app is working, it will work the same in the future. Another important consideration is scaling. Shiny apps are single-threaded, but running multiple instances of the same image can serve many users at the same time. Let’s dive into the details of how to achieve these.
6.1 Docker Concepts
Containers provide portability, consistency, and are used for packaging, deploying, and running cloud-native data science applications. Docker is the most popular virtualization environment to deliver software in containers. Docker is also well supported for Python and R. Among the many use cases, Docker is most commonly used to deploy reproducible workflows and to provide isolation for Shiny apps.
Containers bundle their own software, libraries and configuration files and are isolated from one another. Containers are the run-time environments or instances defined by container images. Let’s review the most important concepts. Figure 6.1 illustrates how all the Docker-related concepts all fit together.
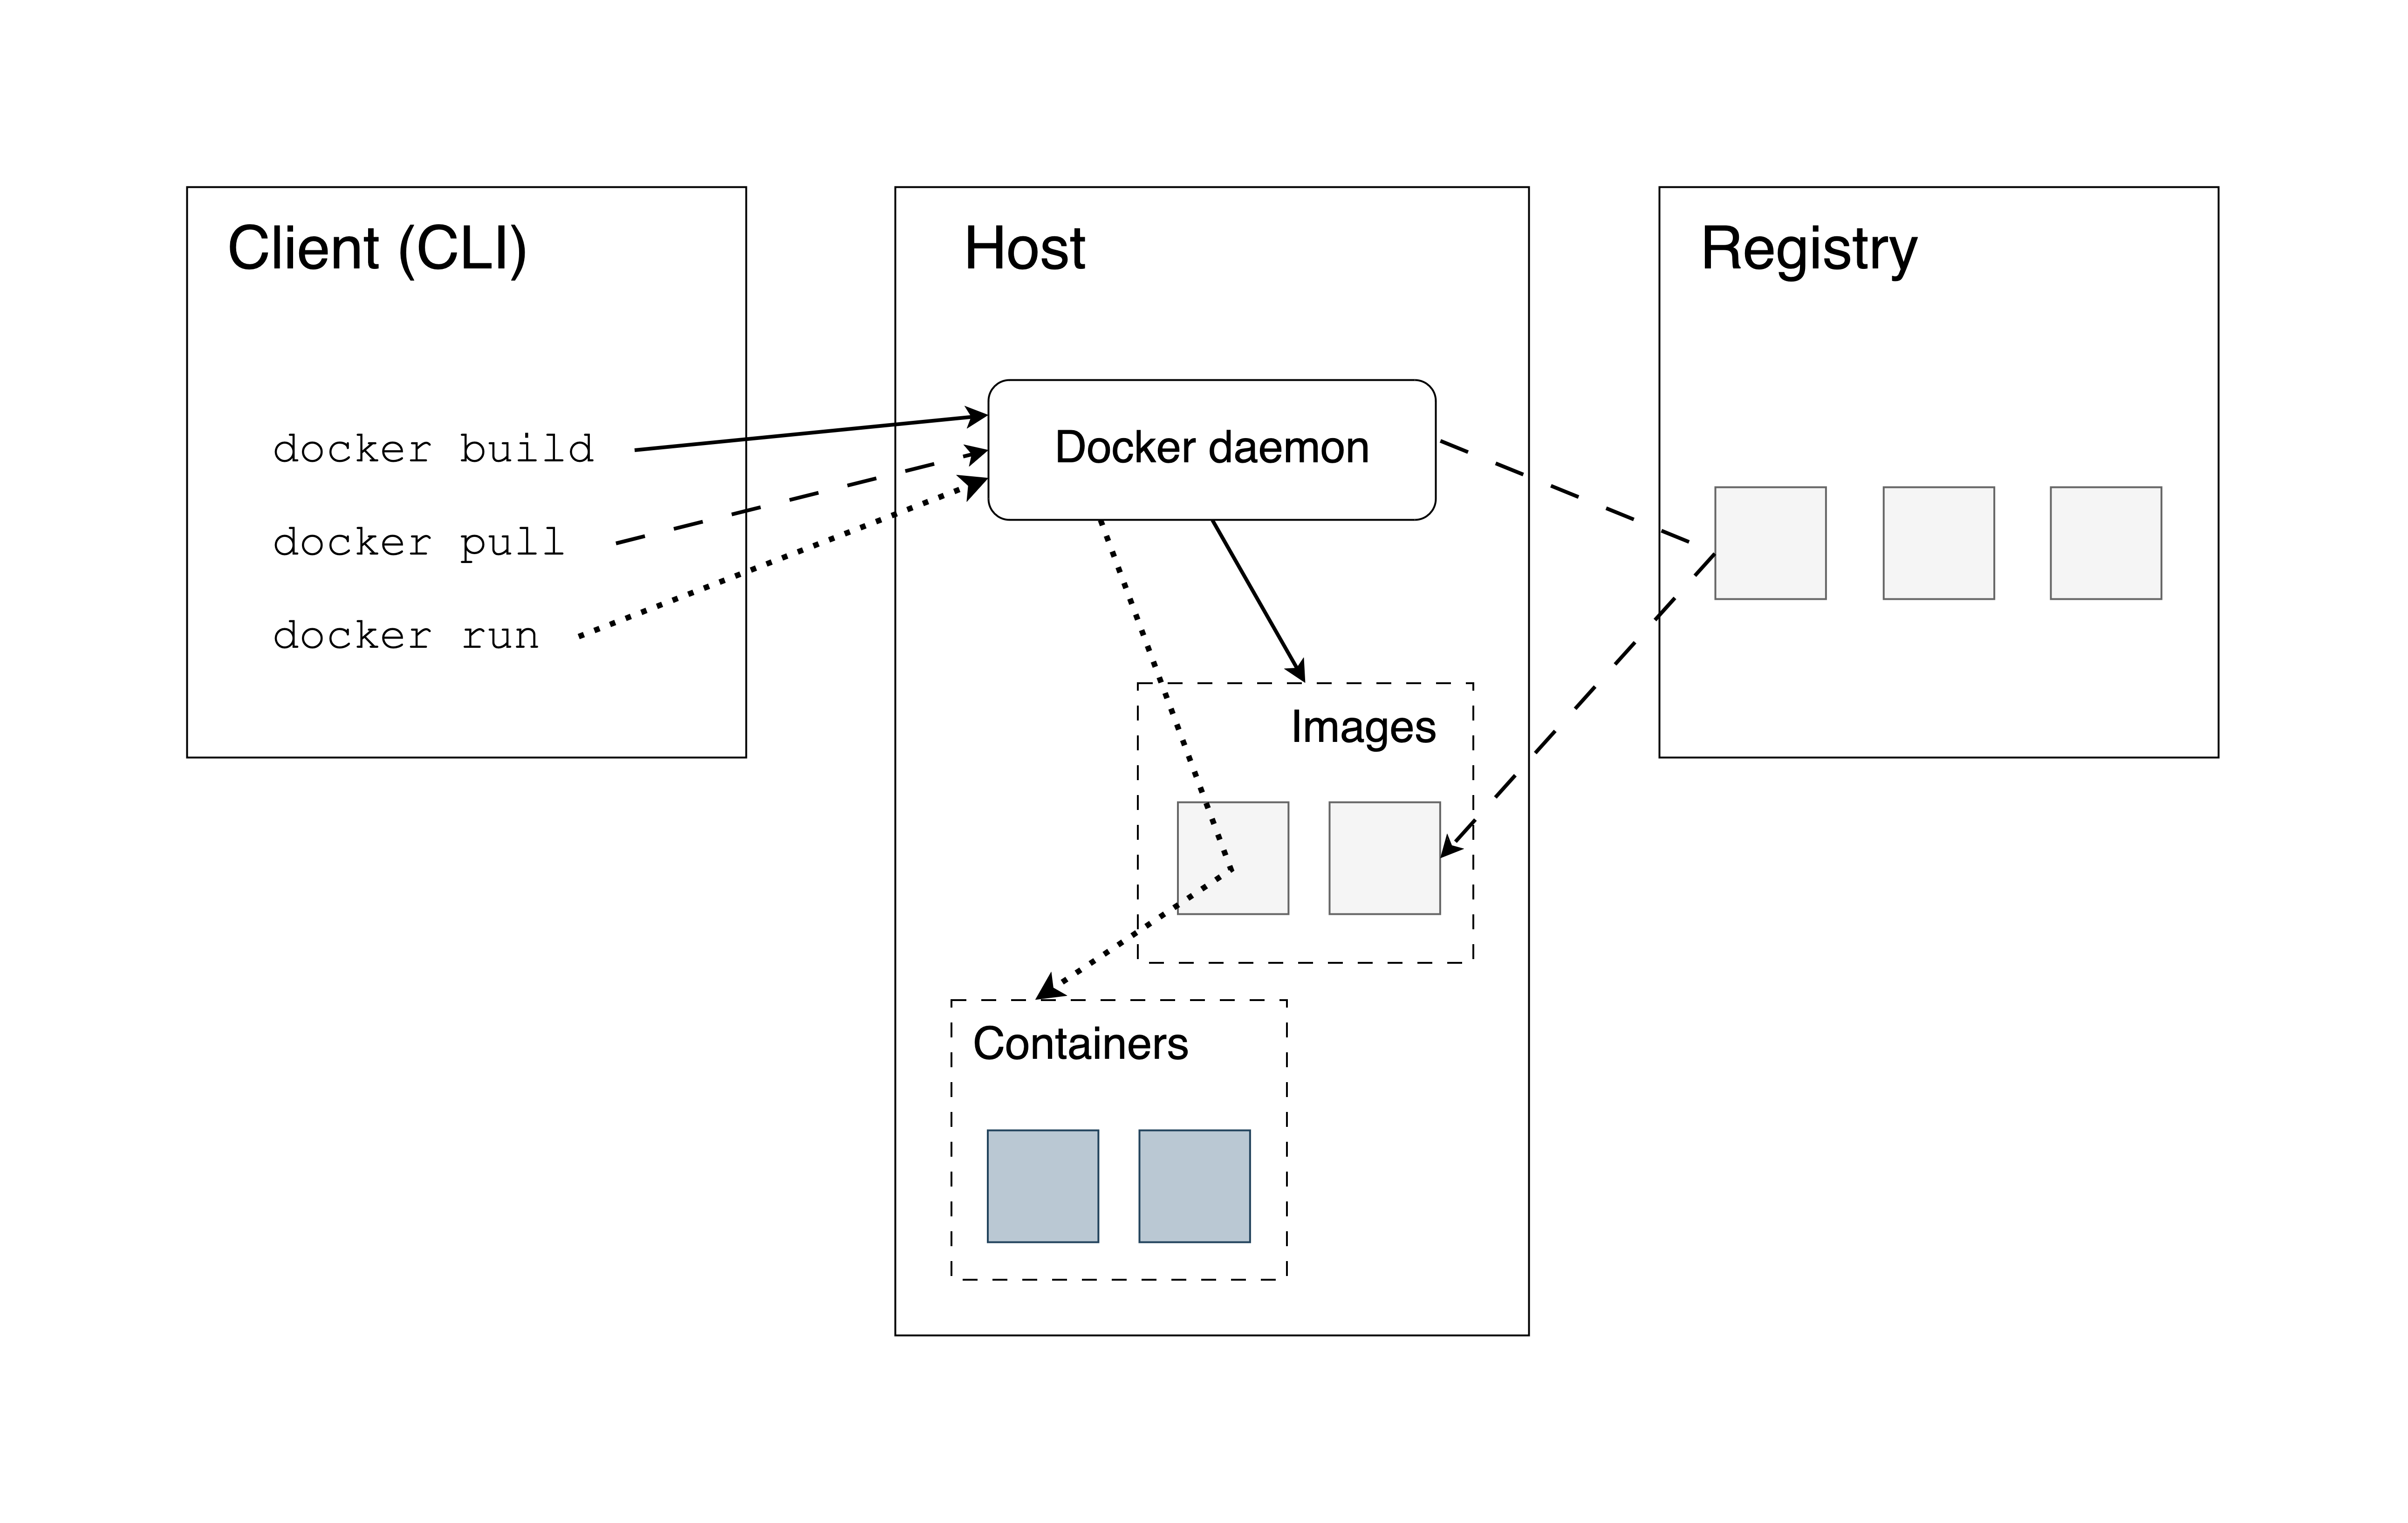
Figure 6.1: Docker architecture. Follow the solid, scattered and dotted lines to see how the Docker command line interface (CLI) interacts with the the Docker daemon and the container registry for various commands.
You as the user, will use the command line as the client to the Docker Engine which exists on a host machine. The Docker Engine interfaces with the container registry to pull the necessary images for building a local copy of an image on the host for running an instance of a container.
6.1.1 Docker Engine
The Docker Engine is a client-server application that includes a
server (a long-running daemon process called dockerd that listens to API
requests), an application programming interface
(REST API) that specifies the interface that programs can use to talk to the
daemon process, and a command-line interface (CLI) that is the client-side
of Docker.
The CLI uses the REST API to control or interact with the Docker daemon. The daemon creates and manages Docker objects, such as images, containers, volumes, networks, etc.
6.1.2 Container Registries
A Docker registry stores Docker images. Docker Hub is a public registry and Docker is configured to look for images on Docker Hub by default. There are many other registries, or users can have their own private registries. You will see some examples later. Strictly speaking, container registries are for images and not containers.
6.1.3 Images
An image is a read-only template with instructions for creating a Docker container. You can view an image as a set of compressed files and metadata describing how these files – also called image layers – fit together.
An image can be based on another image with additional customization on top of this so-called base* or a parent** image. A base images is an image created from “scratch”, whereas a parent image is just another image that serves as the foundation for a new image. You might see the term base image used for both situations when reading tutorials. Don’t get confused, the Docker lingo has a few inconsistencies that we just have to accept and move on.
6.1.4 The Dockerfile
Docker builds images by reading the instructions from a file called
Dockerfile. A Dockerfile is a text document that contains all the
commands to assemble an image using the docker build CLI command. You
will learn more about the Dockerfile as part of the worked Shiny
examples later.
6.1.5 Containers
A container is a runnable instance of an image. Users can create, start, stop a container using the Docker API or CLI. It is also possible to connect a container to networks or attach storage to it.
By default, a container is isolated from other containers and the host machine. The degree of isolation can be controlled by the user and depends on whether it is connected to networks, storage, other containers, or the host machine.
6.1.6 The Docker Command Line
The most common Docker CLI commands are:
docker login: log into a Docker registry,docker pull: pull an image from a registry,docker build: build a Docker image based on aDockerfile,docker push: push a locally built image to a Docker registry,docker run: run a command in a new container based on an image.
You will learn more about these commands in the subsequent sections.
6.2 Working with Existing Images
Let’s learn how to work with an existing image. Such an image is stored in a container registry where we can pull it from if we know its name.
6.2.2 Pulling an Image
You can use the docker pull <image-name> command to pull an image from
a public registry. For example docker pull ubuntu:24.04 will pull the
24.04 version of the “official” Ubuntu image from the Docker Hub.
docker pull rocker/r-base:4.4.1 will pull the image with R version 4.1.1.
Pull the R Shiny version of the Old Faithful as:
docker pull ghcr.io/h10y/faithful/r-shiny

# Using default tag: latest
# latest: Pulling from h10y/faithful/r-shiny
# Digest: sha256:12e[...]4ea
You can see from the messages that the latest tag was applied because
we did not specify the tag. We can also see the SHA256 digest, that is
a unique and immutable identifier. The name can change, or multiple names can
refer to the same image (i.e. a set of layers and their manifest). But the
image digest will be the same. To “pin” the exact version, you can use the
<image-name>@sha256:12e[...]4ea pattern (use the actual digest copied from
your screen without the [...]):
To pull all images from a repository, you can use the --all-tags flag:
This will pull not only the latest, but also the image tagged as main
named after the Git branch. Use the docker images command to list the
images.
6.2.3 Docker Login
You don’t need to authenticate for public images, but in case you are trying to pull a private image from a private repository, you need to log into the container registry. Such private repositories are common and are available on Docker Hub, the GitHub or GitLab container registries. More on the different container registries later.
To log in to the GitHub container registry, use:
This command will ask for our credentials interactively. If you want, you can provide your username and password. But it is usually recommended to use an access token instead of your password because the token can have more restricted scopes, i.e. only used to (read) access the container registry which is a lot more secure. You can also set expiry dates and can revoke these tokens any time without having to change login passwords elsewhere.
Let’s say that you saved your GitHub token value in a file ~/my_token.txt in
the root of your home folder (~). You can pass the PAT value to the
docker login command via the standard input as:
where <username> is your GitHub username.
6.2.4 Running a Container
The next command is docker run which runs a command in a new container.
It pulls the image if needed before starting the container.
Try the following command. It will pull the latest image for the Python build of the Old Faithful example app, then it will start a new container:
The -p is a shorthand for --publish that instructs Docker to
publish a container’s port to the host port. In our example, 3838 is the
container’s port which is mapped to port 8080 of the host machine. As a
result, you can visit http://127.0.0.1:8080 in your browser to see the
Python Shiny app. Hit CTRL+C in the terminal to stop the container. We will
learn about container ports in a bit, but in essence it is just a channel that
is used to send information back and forth.
6.3 Building a New Image
So far you saw how to use the basic Docker commands to pull and run images. Now you’ll build a Docker image by recreating the Old Faithful Shiny app that we worked with before.
In our examples, we will use the following setup: a file named Dockerfile
sits next to a folder named app, and the Shiny app files like
app.R or app.py are in this folder. This setup is convenient
because we can copy all the files from the app folder without
having to worry about copying files that should not be there.
You can follow along the examples by downloading or cloning the GitHub repository
with git clone https://github.com/h10y/faithful.git. All the different builds
of the Old Faithful app from Chapter 5
will have a Dockerfile and instructions in the README.md files within each
folder.
6.3.1 R for Shiny
For our R Shiny example within the r-shiny folder,
this is what is inside the Dockerfile:
FROM rocker/r2u:24.04

RUN R -q -e "install.packages('shiny')"

RUN groupadd app && useradd -g app app
WORKDIR /home/app

COPY app .

RUN chown app:app -R /home/app
USER app
EXPOSE 3838

CMD ["R", "-e", "shiny::runApp(host='0.0.0.0', port=3838)"]
We will explain the Dockerfile instructions in the next section.
For now, you can use the docker build command to build the image from the
Dockerfile. You will have to be in the same directory as the Dockerfile,
this place is what we’ll call as the build context.
This is what the . at the end of the command stands for:
The context here specifies the current directory (.), but it can be
any relative or absolute filepath. Files and directories inside the
context directory are available to the builder, so it can load them when needed.
You can use a .dockerignore file to list files and directories that should
be ignored within the build context. It is similar to the .gitignore file.
The instructions are taken from the Dockerfile at the root of the build
context. If you want to specify a different file, do so by providing the
path to the file using the -f (or --file) option as docker build -f Dockerfile2 ..
The -t argument (same as --tag) is followed by the image name
(r-shiny-test) and the tag (v1). If you do not specify the image
name/tag at image build (i.e. docker build .), Docker will not tag the image
but it will have an image ID that you can use later to tag the image with
docker tag <image-id> r-shiny-test:v1.
You can apply multiple tags as:
6.3.2 Buildx and BuildKit
While the builder is running, you’ll see lots of messages printed
as Docker goes through the instructions from the Dockerfile.
As of Docker Engine 23.0 and Docker Desktop 4.19, Buildx is the default build
client and user interface. Buildx brings extended build capabilities with
BuildKit. BuildKit is the server that handles the build execution, e.g.
it communicates with registries, instructs the Docker Engine and accesses
the local file system. You can enable the use of BuildKit on older Docker
systems by setting the environment variable DOCKER_BUILDKIT=1.
The Buildx output is nicer and it provides you with timings for every step
of your Dockerfile:
[+] Building 32.4s (12/12) FINISHED
 => [internal] load build definition from Dockerfile                    0.0s
 => => transferring dockerfile: 282B                                    0.0s
 => [internal] load metadata for docker.io/rocker/r2u:24.04             1.2s
 => [auth] rocker/r2u:pull token for registry-1.docker.io               0.0s
 => [internal] load .dockerignore                                       0.0s
 => => transferring context: 2B                                         0.0s
 => [1/6] FROM docker.io/rocker/r2u:24.04@sha256:f327[...]dd73          9.2s
 => => resolve docker.io/rocker/r2u:24.04@sha256:f327[...]dd73          0.0s
[...]
 => [internal] load build context                                       0.0s
 => => transferring context: 845B                                       0.0s
 => [2/6] RUN groupadd app && useradd -g app app                        0.7s
 => [3/6] RUN R -q -e "install.packages('shiny')"                      20.9s
 => [4/6] WORKDIR /home/app                                             0.0s
 => [5/6] COPY app .                                                    0.0s
 => [6/6] RUN chown app:app -R /home/app                                0.1s
 => exporting to image                                                  0.3s
 => => exporting layers                                                 0.3s
 => => writing image sha256:4d10[...]bab7                               0.0s
 => => naming to docker.io/library/r-shiny:v1                           0.0s
Sometimes you want to inspect the output and do not only want the collapsed
output. Add the --progress=plain to the build command to see all the
output. This comes handy when troubleshooting the build.
BuildKit also offers other nice features, for example setting the target
platform(s) for the build via the --platform option.
The default value is the platform of the BuildKit daemon where the build runs,
i.e. your laptop or a server. This can be important for Mac OS X users
on Apple Silicone (M1 and above), because the default ARM64 build will
have poor performance or might fail on other platforms on AMD64 machines.
Use the --platform=linux/arm64 to build the image for AMD64 architecture.
You can also build for multiple architectures at once with
docker build --platform linux/amd64,linux/arm64 ..
See 3.1.5 for enabling virtualization on Mac OS X
to enable builds for multiple platforms.
6.3.3 Inspecting the Image
The output of the build is an image that has a SHA256 hash that can be used
as a unique identifier. The image is made up of image layers. These layers are
created by the instructions from the Dockerfile. If you run the build command
again you will notice that instead of 32 seconds, it will take almost no time
to build the image. This is because the layers are cached by default and Docker
smartly evaluates which instructions and files have changed since the last
build. Sometimes the cache gets tangled, or you just want to make sure that
the error is not a caching issue. In this case use the --no-cache flag
with docker build.
You can use the docker history r-shiny:v1 command to see how the image was
built and you can see the sizes for every layer. Intermediate layers
have a size of 0B and these do not contribute to the overall image size.
The layers created 2 hours ago are the layers we created, the layers
created 2 weeks ago are the layers from the parent image rocker/r2u:24.04,
whereas the layers created 2 months ago are the official ubuntu:24.04 image
layers that form the parent image of the rocker/r2u:24.04 one:
IMAGE          CREATED        CREATED BY                                  SIZE
4d[...]52   2 hours ago    CMD ["R" "-e" "shiny::runApp(host='0.0.0.0',   0B
<missing>   2 hours ago    EXPOSE map[3838/tcp:{}]                        0B
<missing>   2 hours ago    USER app                                       0B
<missing>   2 hours ago    RUN /bin/sh -c chown app:app -R /home/app #    780B
<missing>   2 hours ago    COPY app . # buildkit                          780B
<missing>   2 hours ago    WORKDIR /home/app                              0B
<missing>   2 hours ago    RUN /bin/sh -c R -q -e "install.packages('sh   109MB
<missing>   2 hours ago    RUN /bin/sh -c groupadd app && useradd -g ap   5.14kB
<missing>   2 weeks ago    RUN /bin/sh -c apt-get update         && apt   642MB
<missing>   2 weeks ago    ENV TZ=UTC                                     0B
<missing>   2 weeks ago    ENV DEBIAN_FRONTEND=noninteractive             0B
<missing>   2 weeks ago    ENV LANG=en_US.UTF-8                           0B
<missing>   2 weeks ago    ENV LC_ALL=en_US.UTF-8                         0B
<missing>   2 weeks ago    RUN /bin/sh -c useradd -s /bin/bash -m docke   81.6MB
<missing>   2 weeks ago    LABEL org.label-schema.license=GPL-2.0 org.l   0B
<missing>   2 months ago   /bin/sh -c #(nop)  CMD ["/bin/bash"]           0B
<missing>   2 months ago   /bin/sh -c #(nop)  ADD file:ac9d5a9d5b9b1217   76.2MB
<missing>   2 months ago   /bin/sh -c #(nop)  LABEL org.opencontainers.   0B
<missing>   2 months ago   /bin/sh -c #(nop)  LABEL org.opencontainers.   0B
<missing>   2 months ago   /bin/sh -c #(nop)  ARG LAUNCHPAD_BUILD_ARCH    0B
<missing>   2 months ago   /bin/sh -c #(nop)  ARG RELEASE                 0B
The docker inspect r-shiny:v1 returns a long JSON output that is the
metadata of the image. It also has the SHA256 hash of the image.
Here is the greatly simplified output:
[
    {
        "Id": "sha256:4d10[...]bab7",
        "RepoTags": ["r-shiny:v1"],
        "Created": "2024-07-05T04:59:01.123398172Z",
        "Config": {
            "User": "app",
            "ExposedPorts": {"3838/tcp": {}},
            "Cmd": ["R","-e",
                "shiny::runApp(host='0.0.0.0', port=3838)"],
            "Volumes": null,
            "WorkingDir": "/home/app",
            "Entrypoint": null,
        },
        "Architecture": "amd64",
        "Os": "linux",
        "Size": 909132976,
        "Metadata": {
            "LastTagTime": "2024-07-05T06:20:22.2764725Z"
        }
    }
]
Once the docker image is built, you can run the container to make sure the app is working as expected:
6.3.4 Python for Shiny
You can find the Python for Shiny example in the py-shiny folder of the
Old Faithful example repository. The Dockerfile for the Python version looks
like this:
FROM python:3.9

COPY app/requirements.txt .
RUN pip install --no-cache-dir --upgrade -r requirements.txt

RUN groupadd app && useradd -g app app
WORKDIR /home/app

COPY app .

RUN chown app:app -R /home/app
USER app
EXPOSE 3838

RUN mkdir .config
ENV MPLCONFIGDIR=/home/app/.config
ENV HOME=/home/app

CMD ["uvicorn", "app:app", "--host", "0.0.0.0", "--port", "3838"]
We’ll explain each line shortly. To build and check the Docker image, use the following commands:
export DOCKER_DEFAULT_PLATFORM=linux/amd64

docker build -t py-shiny:v1 .

docker run -p 8080:3838 py-shiny:v1
The DOCKER_DEFAULT_PLATFORM environment variable is not strictly necessary,
but it can save you some headaches on Mac OS X when the platform for the parent
image is not matching the local ARM64 architecture of your Apple Silicone.
6.4 Managing Images
There are a few commands that you need to know to manage your Docker images in the absence of the Docker Desktop graphical user interface. This will pay off later when you have no such luxuries on a server.
To list the Docker images, use the docker images command. It will give you
a quick summary of the images:
REPOSITORY   TAG       IMAGE ID       CREATED             SIZE
py-shiny     v1        ed11a2980c07   5 seconds ago       1.24GB
r-shiny      v1        4d10f42d6a52   About an hour ago   909MB
Size is the space taken up by the image and all its parent images.
You can filter the output, for example docker images --filter=reference="py-*"
will give you images whose name starts with py-, whereas
docker images --filter=reference="*:v1" will list images that are tagged with
v1.
Use the docker rmi <image-name-or-id> to remove an image based on its name or
the image ID.
The docker system df command will give you a concise summary of disk usage
by the Docker daemon including images, containers, and volumes:
TYPE            TOTAL     ACTIVE    SIZE      RECLAIMABLE
Images          2         1         1.457GB   1.355GB (98%)
Containers      1         1         0B        0B
Local Volumes   0         0         0B        0B
Build Cache     117       0         3.005GB   3.005GB
If you build images during development while keeping the image name and tag the
same you will end up with “dangling” images that are untagged and are not used
any longer. Dangling images can accumulate over time and can fill up the
available space that Docker Desktop is allocating for images.
Use docker system prune to clean up these dangling images.
The command docker system prune --all will remove all unused images and containers.
The Docker Desktop uses a finite amount of disk space that can fill up. Do the cleanup or go to the Docker Desktop settings and under Resources you should be able to change the virtual disk limit. You can check the RAM, CPU, and disk usage by looking at the bottom of the Docker Desktop window.
6.5 Sharing Images
As we saw, Docker images are just compressed files linked by metadata.
You should be able to copy these files and move them around.
The docker save command lets you save an image to a compressed tar file:
Next, you take this tar file, copy it to another server and load it with:
This restores both the image and the tags.
Now imagine that you are managing more than two machines, or you want to share the Docker image with others so that they can use it or to serve as a parent image. The save/copy/load workflow becomes cumbersome quickly. In this case, using a registry might be a much better idea. There are many options to choose from, and you can even host your own registry.
6.5.1 Pushing Images
Let’s tag the r-shiny image so that it has a host defined:
Now we can push the locally built Docker image to a container registry:
Note that this command will not work on your machine because you do not
have write access to the ghcr.io/h10y/faithful repository.
You need to create an image name that would let you push to your own personal
Docker Hub account as an example.
The image tag should start with the registry name unless you are pushing
to Docker Hub. When the image tag is not specified, Docker will treat
the new image as :latest automatically.
6.5.2 Docker Registries
A Docker registry stores Docker images. This is where we push images to and pull
images from. Docker Hub
is a public registry and Docker is configured to look for images on Docker Hub by
default. Docker Hub is a service provided by Docker for finding and sharing
container images. The canonical host name for Docker Hub is docker.io. This
is the default registry when you don’t specify a registry host as part of the
image name.
There are many other registries out there besides Docker Hub. Here is a non-exhaustive list of options.
The GitHub Container Registry (GHCR) is available as part of GitHub Packages
for free and paid plans, even for private repositories under the free
plan. This registry requires no authentication for public images, otherwise
you have to authenticate using your GitHub token. The visibility of the
images inherits the repository visibility but can be changed by the owner.
The host name for GHCR is ghcr.io.
An alternative to GitHub is GitLab (host name registry.gitlab.com),
that has provided registry support for its free (public and private) repositories
long before GitHub. The registry is tightly integrated with GitLab’s CI/CD
pipelines. This registry also needs login with a token for private images.
Heroku is a platform provider and it also comes with a Docker
registry (host name is registry.heroku.com) where the Docker-based deployments
push the images to.
Every major cloud provider offers a Docker container registry that is integrated with their other offerings. Latency should be minimal due to network proximity to the servers:
- Amazon Elastic Container Registry
- Azure Container Registry
- Google Container Registry
- DigitalOcean Container Registry
Other common alternatives for container registries include the JFrog Container Registry, Harbor, and Scaleway.
Although these services are called “container registry”, but strictly speaking they store container images.
6.5.3 Log In to a Registry
When you work with private registries or private images, you need to log
in with the docker login command. For Docker Hub, just type
docker login. For all other registries, type in the registry URL as
well, e.g. docker login ghcr.io.
The Docker CLI then will prompt you for your username and password (or access token).
You can log in programmatically by providing your username and the password through standard input from a file:
The my_password.txt in this example is is a simple text file with the token
inside and it can be found in the root of your home folder (~). Change the
file path and file name as needed.
You can also use an environment variable to store your token value that you can pass to the login command as:
Notice the white space before the export statement, use double spaces so that
the command after the spaces will not be saved in your shell history.
The history allows you to recall previous commands by pushing the up arrow
key. The shell history is really just a text file, so copy pasting secrets
into the terminal will leave a trace. Use this trick for sensitive information.
With one of these approaches you can log into any public or private repository
for which you have credentials. The credentials will be stored
locally in $HOME/.docker/config.json on Linux and Mac or in
%USERPROFILE%/.docker/config.json on Windows. After login, there is no
need to re-authenticate until you log out with docker logout.
It is always a good idea to use a token instead of your password. Tokens can have limited scope (i.e. only for pulling images), and can be revoked at any time without it impacting other areas of your life.
Note that docker login requires users to use sudo or be the root user.
6.5.4 Local Registry
You might not want the Docker images to leave your computer because you need an air gapped environment, or you are setting up a registry within your virtual private network (VPN). In these situations, you can host your own container registry.
If you want a registry hosted on your machine, just pull the registry image. The next command will pull the registry image, and run the similarly named container in the background on port 5000:
Giving a container a name makes it easier to remove the container later, this
way you don’t have to find the container ID. The restart policy always restarts
the container if it stops, but not when it is manually stopped.
The -d flag will start the container in a background process, so you get back
the shell prompt, and you will not see the container log messages.
Tag an image with the host name of your local registry, localhost:5000, and
push the image:
To test if it worked, remove the images from your local Docker system.
If you use the -f flag and specify the image ID then the docker rmi
command untags and removes all images that match that ID (get the image ID
from docker images):
Now you can pull the image from your local registry:
The next command stops and removes the registry container. It is a daemonized
(background) process, so CTRL+C won’t work. The -v option makes sure to remove
anonymous volumes associated with the container which is often used to mount a
volume from your hard drive into the container where the images are stored:
If you want your registry to be accessed over a public network, then you need to think about security and access control. You’ll have to set up transport layer security (TLS) for HTTPS and user authentication, which are advanced topics and we recommend using a commercial container registry that we listed above and use private repositories to control access to your images.
6.6 The Dockerfile
It is time to review the Dockerfiles line by line and learn about each of the different types of instructions and their uses. We organize the sections according to functional steps based on the Dockerfiles for our R and Python apps. The full Dockerfile reference can be found at https://docs.docker.com/reference/dockerfile/.
6.6.1 The Parent Image
The FROM instruction initializes a new build stage and sets the base
(FROM SCRATCH) or parent image (e.g. FROM ubuntu:24.04).
For the R version we used the FROM rocker/r2u:24.04 and for the Python version
we used FROM python:3.9. We will review the different parent images and
how to use multiple parent images in the same Dockerfile as part of a
multi-stage build later.
6.6.2 Metadata
The LABEL instruction is optional, it adds metadata to an image, e.g.
who to contact in case of issues or questions:
We’ll talk more about labels as part of continuous integration and continuous delivery (CI/CD) /FIXME: add ref here/.
6.6.3 Dependencies
We often use the RUN instruction to install dependencies and use other
shell commands to set permissions to files, etc.
RUN executes a command in a new layer on top of the current
image. We used the RUN R -q -e "install.packages('shiny')" to install
the shiny R package, whereas the Python version used the
requirements.txt alongside the pip command as:
We also used RUN to add a user called app to a Linux user group called app.
This is needed because you do not want to run containers as the root user in
production. Running the container with root privileges allows unrestricted
use which is to be avoided. Although you can find lots of examples on the
Internet where the container is run as root, this is generally considered bad
practice. This is how we created the non-root user:
6.6.4 Directories and Files
Next we changed the working directory to /home/app that is he home folder
of the non-privileged app user:
The WORKDIR instruction sets the working directory for any
RUN, CMD, ENTRYPOINT, COPY and ADD instructions that follow it in the
Dockerfile.
The COPY instruction copies new files or directories from the source
and adds them to the file system of the container at the destination path.
The source here is the app folder inside the Docker build context.
The contents of the folder, including the Shiny app files, are copied.
The destination path . refers to the current work directory defined previously,
in this case, the /home/app folder.
Use an alternative format if the paths contain whitespace:
COPY ["dir with space", "."].
You would almost always use COPY in your Dockerfile, but a very similar
instruction is ADD. ADD allows the source to be a URL, a Git
repository, or a compressed file.
Wildcards, such as * for multiple characters and ? for single character,
are supported in COPY and ADD instructions. For example
COPY app/*.py . will copy only the Python scripts and nothing else.
Normally when the source does not exist docker build exits with an error.
An interesting feature of wildcards is that the build does not error
if there are no matching results. For example COPY *renv.lock . will copy
the renv.lock file if it exists, but the build won’t stop if it does not.
The owner of the files and directories at the destination is the root user.
If you want to set the user and the group so that the non-root user will
be able to access these resources you can use the optional --chown flag
that stands for change owner:
Here the --chown app:app sets the user and the group values to app.
This is equivalent to the following combination of COPY and RUN:
Similarly, use the --chmod flag to define read/write/execute permissions.
6.6.5 Switching User
The USER instruction sets the user name to use as the default user for
the ENTRYPOINT and CMD commands. We used USER app to switch to the
non-root app user.
6.6.6 Expose a Port
The EXPOSE instruction defines the port that Docker container listens on
at runtime. We chose port 3838 with the EXPOSE 3838 instruction.
This is the container port that we connect to using the
docker run -p 8080:3838 <image-name> command.
You can pick any port, but remember that exposing a lower port number, like
80 (the standard HTTP port) will require elevated privileges.
In general, we recommend using port numbers 1024 and above. Using lower
ports will result in failures with a non-root user, such as our app user.
6.6.7 Variables
The ENV instruction sets the default values for environment variables.
We set two variables for the Python app to allow configs to be written
for matplotlib by the app user:
These environment variables will be part of the final image, so do not use ENV
to add secrets to the image at build time. Such environment variables should be
added at runtime, e.g. with docker run --env TOKEN=<token-value> <image-name>
or using a file as docker run --env-file .env <image-name> which will
read the variables from the .env file.
The ARG instruction defines a variable that users can pass at build-time.
For example, adding ARG GITHUB_PAT to the Dockerfile
would allow you to use the remotes::install_github() function to install
an R package from a private GitHub repository. You can provide the token
value to docker build as:
The token value will not be available in the container at runtime.
6.6.8 Executable and Command
We got to the end of the Dockerfile. This is where we define the
process that is executed inside the container at run time via the
ENTRYPOINT instruction. This is often omitted. In that case, the default
executable is set to /bin/sh -c that is the shell executable.
Shell is a basic command-line interpreter and the -c
flag indicates that the shell will read the commands to execute from a string.
This string is provided through the CMD instruction.
For example we can add CMD uvicorn app:app --host 0.0.0.0 --port 3838
as the default set of arguments supplied to the ENTRYPOINT process
to start the Python Shiny app.
The RUN, CMD, and ENTRYPOINT instructions have two possible forms.
The shell form is used mostly with the RUN instruction because it allows
useful shell features like piping the output and chaining commands.
The shell form is written without square brackets and it would look like this
for the R Shiny app:
This command will execute as a child processes of the shell, and as such,
signals like CTRL+C will not be forwarded to the child process by the shell.
This is why it is recommended to use the so called “exec” form for the CMD and
ENTRYPOINT instructions. The “exec” form is written between square
brackets. Here it is for the R version:
And for the Python version:
When we discussed local hosting of the Shiny apps we did not review all the
possible arguments for the R and Python commands. Two options here beg for introduction.
The host defines the IP address that the app listens on. The default host
value is 127.0.0.1 (also known as localhost or loopback address).
If we leave the host at its default value, we will not be able to access the
container from outside because localhost can only be accessed from the same
address. This is the reason why we need to set it to 0.0.0.0 which can be
accessed from outside of the container.
The other important argument is the TCP port that the application is listening
on. If the prot is not provided for the R Shiny command, Shiny will pick a
random port number. We obviously do not want to guess this port, so we need to
set it. The 3838 port number is the same as the number we exposed via the
EXPOSE 3838 instruction.
It is possible to use an environment variable for the port number
and substitute it in the CMD command:
This way the default value is set to 3838, but you can override it at runtime
as docker run --env PORT=5000 <image-name>.
6.7 Parent Images
We have reviewed Docker basics and how to dockerize a very simple Shiny app. For anything that is a little bit more complex, you will have to manage dependencies. Dependency management is one of the most important aspects of app development with Docker. And it begins with finding the right parent image as the basis of the rest of your Dockerfile.
The ground zero for Docker images is the reserved and explicitly empty
image called scratch. FROM scratch is used for hosting super minimal images
containing a single binary executable or as the foundation of common base images
such as debian, ubuntu or alpine.
Debian is a Linux distribution that’s composed entirely of free and open-source software and is a community project. Ubuntu is derived from Debian and is commercially backed by Canonical. Ubuntu uses the same APT packaging system as Debian and many packages and libraries from Debian repositories. Both of these Linux distributions are loved for their versatility and reliability, and the huge user base ensures first class community support.
Alpine Linux is a minimal distribution independent of Debian and other distributions. It was designed with a focus on simplicity, security, and efficiency. This distribution has a very compact size, and therefore is a popular choice for embedded systems and IoT devices. This distribution is also community maintained.
Here are the sizes for these three images. Debian is the largest, Ubuntu in the middle, and the Alpine being more than 10 times smaller:
REPOSITORY TAG IMAGE ID CREATED SIZE
debian 12.6 7b34f2fc561c 7 days ago 117MB
ubuntu 24.04 35a88802559d 4 weeks ago 78.1MB
alpine 3.20 a606584aa9aa 2 weeks ago 7.8MBMany of the commonly used R and Python parent images use Debian/Ubuntu or Alpine as the starting point. The general trade-off between these two lineages comes down to convenience vs. minimalism. Ubuntu and its derivatives tend to be much larger in size, but build times can be considerably faster due to very mature package management system and the availability of pre-built binaries.
Alpine-based images, however, tend to be much smaller, almost bare bones. Alpine uses different compilers that Ubuntu so you’ll often have to build and compile your packages from source. This can be tedious and time consuming. However, its small size reduces the surface area for potential attackers and as a result the images tend to be less vulnerable.
The final image size is important to consider, but images based on the same parent image share lots of their layers anyways, so the images can pack much tighter on your hard drive than you might think based on their size without subtracting common layers. Also,the size advantage of the Alpine distribution evaporates quickly as you start adding R and Python libraries. Some packages will take up more space than the parent image itself.
6.7.1 Popular Parent Images for R
Let’s see some of the most popular base R images based. Here is the
output from docker images after pulling each of these Docker images:
REPOSITORY TAG IMAGE ID CREATED SIZE
r-base 4.4.1 16511f39cdb4 3 weeks ago 833MB
rocker/r-base 4.4.1 22b431698084 3 weeks ago 878MB
rocker/r-ver 4.4.1 9bb36eff1caa 3 weeks ago 843MB
rocker/shiny 4.4.1 a90ccd5c09b9 3 weeks ago 1.58GB
rocker/r2u 24.04 1441545ed6df 2 weeks ago 800MB
rhub/r-minimal 4.4.1 1e280d0205b7 3 weeks ago 44.9MBThe official r-base image is an R installation built on top of Debian. It is
maintained by the Rocker community (https://rocker-project.org/, Boettiger and Eddelbuettel (2017)).
This r-base image is like the rocker/r-base, these two images are built
from the same Dockerfile, but with different build tools.
The Debian Linux distribution is more cutting edge than Ubuntu.
This means it has unstable repos added and it receives updates faster.
It is for those who like to live on the cutting edge of development.
For those who value stability more, the Ubuntu based images could be better
suited. Such as the Rocker versioned stack, rocker/r-ver, which emphasizes
reproducibility. This stack has both AMD64 and experimental ARM64 support
for R version 4.1.0 and later. For the AMD64 platform, it serves compiled
binaries of R packages that makes package installs speedy.
The default CRAN mirror for rocker/r-ver is set to the Posit Public Package Manager
(P3M, https://p3m.dev/, previously called RStudio Package Manager or RSPM).
To ensure reproducibility, the non-latest R version images
install R packages from a fixed snapshot of the CRAN mirror at a given date.
So you’ll end up with the same package versions no matter when you build your image.
The rocker/shiny image is based on the rocker/r-ver stack and comes with
Shiny related packages and Shiny Server Open Source installed. This makes it the
beefiest of all the images presented. It has 68 packages available instead of
the 31 within the r-base and r-ver stacks (14 base and 15 recommended packages).
The images so far have been tagged by the R version that is inside the image,
e.g. 4.4.1.
The rocker/r2u is based on Ubuntu as well, and it brings Ubuntu binaries for
CRAN packages fully integrated with the system package manager (apt).
When you use install.packages() it will call apt in the background.
This has the advantage that system dependencies are fully resolved, i.e. no need
to guess and manually install them. Installations are also reversible.
It uses the CRAN mirror at https://r2u.stat.illinois.edu.
Keep in mind that packages and R itself are generally the highest available version.
Therefore, the image tag is not based on the R version but based on the
Ubuntu LTS (Long Term Support) version, like 24.04.
All the Rocker images pack utilities that help with command line tasks,
such as installing packages via install.r and installGithub.r,
all part of the littler project (Eddelbuettel and Horner 2024). There is even a command line
tool for Shiny, so instead of
CMD ["R", "-e", "shiny::runApp(host='0.0.0.0', port=3838)"]
you can use CMD ["shiny.r", "-o", "0.0.0.0", "-p", "3838"] in your Dockerfile.
Finally, the rhub/r-minimal image is based on Alpine Linux and is the tiniest
available image for R. This feat is achieved by not having recommended R packages
installed (it has a total of 14 required packages), it does not have any
documentation or translations, no X11 window support.
It does not even have C, C++ or Fortran compilers. So if an R package relies on
compiled code, first you have to install a compiler, then later uninstall it
to keep the image size minimal. The installr script provided as part of the
image helps with the installation and clean-up of build time dependencies,
see installr -h for the available options.
If you are looking for Linux distributions other than what we listed so far
(Debian, Ubuntu, Alpine), take a look at the
rstudio/r-base images
that bring versioned base R to many Linux distributions, e.g. CentOS,
Rocky Linux, and OpenSUSE.
6.7.2 Popular Parent Images for Python
The official Python images are maintained by the Python community and are either based on Debian or Alpine Linux. Here are the most commonly used variants:
REPOSITORY TAG IMAGE ID CREATED SIZE
python 3.9 8912c37cec43 12 days ago 996MB
python 3.9-slim b4045d7da52e 12 days ago 125MB
python 3.9-alpine 893ee28ab004 12 days ago 53.4MBThe python:<version> image is the largest and is the most general supporting
all kinds of use cases and is recommended as a parent image. It contains the
common Debian packages and compilers.
The python:<version>-slim version contains only the minimal Debian packages
needed to run Python itself. It does not contain the compilers for modules
written in other languages. This is the reason for the image’s reduced size.
The python:<version>-alpine is based on Alpine and therefore is the smallest.
It is similarly bare bones as the minimal R image.
6.8 Installing System Libraries
System libraries are required for different purposes. Some libraries are needed
during build time. While others are needed at run time.
Say your R or Python package requires compilation or needs
to dynamically link to other system libraries. In these cases you have to
build your package using compilers (C, C++, Fortran, Rust) and other build
time dependencies. System libraries used at build time includes header files and
tend to have extra dependencies. These build time system libraries are
named with a *-dev or *-devel postfix.
Once your R or Python package has been compiled, you don’t need the build time
libraries any more. However, you need the run time libraries. For example
if your package needs to be built with libcurl4-openssl-dev, the run time
dependency becomes libcurl4. The run time dependencies tend to be much smaller
and have fewer dependencies. These will have no conflict with other run time
libraries because of the lack of headers included.
6.8.1 Manually Installation
FIXME: Review the Python specific parts.
The Python Wheels project offers binary Python packages. R binaries can be found on CRAN for Windows and Mac OS X. But CRAN does not offer binaries for various Linux distributions for the obvious complexity involved in that. The Posit Public Package Manager provides pre-built binary packages for R and Python. It supports various Linux distributions, including Debian and Ubuntu. The R Universe project provide binaries for CRAN and GitHub packages for Windows, Mac OS X, and in most cases for WebAssembly that is suitable for Shinylive applications. The R Universe project only provides binaries for R packages on Ubuntu using the latest R version.
R and Python packages, once compiled into a binary file, provide metadata about the run time dependencies. You can find the required system libraries on the website of a given repository or package manager. Alternatively, you can try installing the package without its requirements and follow the string of error messages to see what is it that you need to install as a prerequisite.
This GitHub repository lists system requirements for R packages:
rstudio/r-system-requirements.
The primary purpose of this database is to support the Posit Public Package Manager.
To get programmatic access to the database, you can call the
Posit Public Package Manager’s API to request the system requirements.
For example, for the curl R package (Ooms 2024), you can query the API as
https://p3m.dev/__api__/repos/1/packages/curl/sysreqs?distribution=ubuntu.
Replace the curl and ubuntu parts to get results for other R packages and
Linux distributions. The HTTP GET request will result in a JSON response listing
the libraries with the install script needed on Ubuntu (try pasting the
link into the browser address line):
{
"name": "curl",
"install_scripts": [
"apt-get install -y libcurl4-openssl-dev",
"apt-get install -y libssl-dev"
]
}You can also utilize the pak R package (Csárdi and Hester 2024) to query system requirements:
pak::pkg_sysreqs("curl", sysreqs_platform="ubuntu")
# -- Install scripts ---------------------------- Ubuntu NA --
# apt-get -y update
# apt-get -y install libcurl4-openssl-dev libssl-dev
#
# -- Packages and their system dependencies ------------------
# curl - libcurl4-openssl-dev, libssl-devInclude these libraries in your Dockerfile as:
RUN apt-get update && \
apt-get install -y --no-install-recommends \
libcurl4-openssl-dev \
libssl-dev \
&& rm -rf /var/lib/apt/lists/*When using apt-get (the older and stable version of apt) the first command is
always apt-get update which look for updates in the the package lists of
the package repositories. This way the system will know if an update is necessary
and where to find the individual packages. Next apt-get install <package-name>
is called with a few flags: -y means that we answer yes to all the prompts,
whereas --no-install-recommends will prevent unnecessary recommended packages
from being installed. The last bit cleans up the package lists downloaded by
apt-get update which are stored in the /var/lib/apt/lists folder.
All these three commands are chained together with && and we used \ for
breaking up single line commands to multiple lines for better readability
(the backslash escapes a newline character). This arrangement helps organize
the packages and you can also comment them out as needed.
You could put all of these chained commands in a separate RUN
line, but that is not recommended. Having a single RUN instruction will
lead to a single image layer. But what is most important is that the update and
install steps should not be separated. Imagine that you update the package lists
and now the resulting layer is added to the Docker cache.
The next time you add another package to install and rebuild your image.
The update command is cached and will not be rerun by default. As a result,
you might end up with an outdated version of the package.
6.8.2 Automated Dependency Resolution with r2u
If you are using R on Ubuntu, the r2u
project greatly facilitate dependency management.
It uses the Debian package format for R packages for latest R version on
various Ubuntu LTS platforms. This resolves all the system dependencies through
using the .deb binary package format that combines together the pre-built binary
package with the metadata about the dependencies. Then the Debian/Ubuntu package
manager (apt) can do the rest.
The binary packages are base on P3M where available or built natively.
Selected BioConductor packages are also built natively on the project servers.
The server hosting the .deb files is set up as a proper apt repository
with a signed Release file containing metadata that can be used to
cryptographically validate every package in the repository. This file guarantees
that the packages you receive are the one you expected and there has been no
tampering with it during download.
Because the R packages now live as first class
citizens on Ubuntu, uninstalling packages would not unnecessarily remove the
shared dependencies that other packages depend on. With the r2u setup and
using the rocker/r2u images, you can simply call install.packages("curl")
and apt will sort out the dependencies for you in the background.
6.8.3 Dependencies on Alpine Linux
The Alpine Linux has a package manager called apk that is different from
Debian’s and Ubuntu’s apt. This likely means that you might have to work
harder to find all the Alpine-specific dependencies. You can still use the
tools previously mentioned, but will have to find the library for Alpine.
You can also follow the breadcrumbs of the error messages of missing dependencies.
However, the general idea is similar when it comes to working with the Dockerfile:
FROM rhub/r-minimal:4.4.1
RUN apk add --no-cache --update-cache \
--repository http://nl.alpinelinux.org/alpine/v3.11/main \
autoconf=2.69-r2 \
automake=1.16.1-r0 && \
installr -d \
-t "libsodium-dev curl-dev linux-headers gfortran autoconf automake" \
-a libsodium \
shiny plotly e1071
[...]First we declare the minimal parent image, then use a RUN instruction to add
libraries from the Alpine repository. autoconf and automake is required for
building the R packages (shiny, plotly, and e1071). This example is
taken from the minimal Dockerfile for the Bananas example app.
The next pieces uses the istallr utility that comes with the rhub/r-minimal
image and it’s usage is explained on the GitHub site: https://github.com/r-hub/r-minimal.
The -d flag will install C and C++ compilers (gcc, musl-dev,g++)
temporarily, i.e. those will be removed after the successful
compilation and installation of the R packages.
The -t option lists Alpine packages to be installed temporarily (a.k.a.
build time dependencies), and the -a option lists Alpine packages to keep
(a.k.a. run time dependencies). The built in cleanup feature keeps the image
sizes small in line with the goal of the parent image’s purpose.
You can also list not only CRAN packages but different “remotes”, like
tidyverse/ggplot2 for development version of ggplot2 from GitHub,
or local::. to install from a local directory.
The rest of the Dockerfile follow the same patterns as what we saw before. Adding
a non-root user, defining the work directory, copying the Shiny app files
from the build context to the image’s file system, setting owners for the files,
switching to the non-root user, exposing port 3838 and defining the default
command to run that calls shiny::runApp():
[...]
RUN addgroup --system app && \
adduser --system --ingroup app app
WORKDIR /home/app
COPY app .
RUN chown app:app -R /home/app
USER app
EXPOSE 3838
CMD ["R", "-e", "shiny::runApp(host='0.0.0.0', port=3838)"]The Dockerfile for the Faithful Shiny app (https://github.com/h10y/faithful) is somewhat simpler:
FROM rhub/r-minimal:4.4.1
RUN installr -d \
-t "zlib-dev cairo-dev" \
-a "cairo font-liberation" \
Cairo \
shiny
RUN addgroup --system app && \
adduser --system --ingroup app app
WORKDIR /home/app
COPY app .
RUN chown app:app -R /home/app
USER app
EXPOSE 3838
CMD ["R", "-e", "shiny::runApp(host='0.0.0.0', port=3838)"]The reason why we need the Cairo package (Urbanek and Horner 2023) besides shiny is because the minimal
image has no X11 graphic device support which is used to display base R plots, like histograms.
Instead of X11, we can use the Cairo Graphics Library. You can see how we list
the build time cairo-dev library and the run time cairo for the R package.
The installation of the system packages and the general lack of available
binary packages contributes to the longer build times. The Faithful example
took 5 minutes to build with rhub/r-minimal compared to 16 seconds with
rocker/r2u and the final image size was 230 MB compared to 975 MB.
The Bananas app took 10.4 minutes vs. 28 seconds and resulted in an image of
size 113 MB as opposed to 909 MB.
As you can see, the image build time is significantly longer, while the minimal image size is multiplying relative to the parent image’s 45 MB size. The absolute increase in the Ubuntu based image’s size is similar but it is less noticeable in relative terms.
Your Shiny apps are likely to have more dependencies that the examples we are using in this book. You will have to decide if the benefits that a minimal image provides will overweight the increased complexity and development time required to maintain minimalist Shiny images.
6.9 Installing R Packages
The wealth of contributed R packages can supercharge Shiny app development. This also means that you have to manage these dependencies. In the previous sections, we have already hinted at installing these packages. We will now see the different ways of installing R packages.
6.9.1 Explicitly Stating Dependencies
The first approach is to use RUN instructions in the Dockerfile to
install the required packages. You can use the R -q -e "<expression>"
pattern to use any R expression you would normally use in your R sessions
to install packages. The -q flag stands for quiet and means to not print out
the startup message. The -e option means to execute the R expression that
follows it and then exit. The Rscript -e "<expression>" is another way to
evaluate the expressions without echoing the expression itself.
Most often we use the built in install.packages()
function and the different options from the remotes package (Csárdi et al. 2024).
RUN R -q -e "install.packages(c('shiny', 'remotes'))"
RUN R -q -e "remotes::install_github('tidyverse/ggplot2')"
RUN R -q -e "remotes::install_local('.')"The Rocker images have the littler command line utility installed.
The previous code piece can be written as:
RUN install2.r --error --skipinstalled shiny remotes
RUN installGithub tidyverse/ggplot2
RUN install2.r "."The --error flag will throw an error when installation is unsuccessful
instead of a warning, --skipinstalled will skip installing already installed
packages.
If installing from a private GitHub repository, remotes is going to use
the GITHUB_PAT environment variable to authenticate with GitHub to be able to
download and install the package. You have to add the following line to your
Dockerfile before the RUN instructions that define the install from GitHub:
To pass the GITHUB_PAT at image build, use the following commands:
export GITHUB_PAT=ghp_xxxxxxxxxx
docker build -t <image-name> --build-arg="GITHUB_PAT=${GITHUB_PAT}" .The pak R package (Csárdi and Hester 2024) is planned to replace remotes in the future.
It provides very similar functionality and improvements, like parallel downloads,
caching, safe dependency solver for packages and system dependencies using
the P3M database by creating an installation plan before downloading any packages.
Not relevant for Linux containers, but pak can even handle locked package DLLs
on Windows. Let’s see how these common install statements would look using pak
(you don’t need remotes because of using pak):
RUN R -q -e "install.packages('pak')"
RUN R -q -e "pak::pkg_install('shiny'))"
RUN R -q -e "pak::pkg_install('tidyverse/ggplot2')"
RUN R -q -e "pak::pkg_install('.')"The installr utility shipped with the rhub/r-minimal image uses pak
to install packages. The -p flag will remove pak after the installation.
You can do:
You can pin package versions using Git references, e.g. tidyverse/ggplot2@v1.0.0,
or using remotes::install_version().
These functions allow you to provide repositories as argument. But more often,
the repositories are set globally as part of options(). You can include
the list of repositories in the Rprofile.site file:
# Rprofile.site
local({
r <- getOption("repos")
r["p3m"] <- "https://p3m.dev/cran/__linux__/noble/2024-07-09"
r["archive"] <- "https://cranhaven.r-universe.dev"
r["CRAN"] <- "https://cloud.r-project.org"
options(repos = r)
})The P3M repository is set for Ubuntu 24.04 (Noble) with a snapshot of
CRAN taken on July 9th, 2024. This effectively freezes package versions to
enhance reproducibility. This way of pining maximum package versions is also
called “time travel”. The CRAN Haven
repository is for recently archived CRAN packages. These archived packages might
find their way back to CRAN after addressing the issues for which those got
archived. This repository can handle such temporary inconveniences.
COPY this file into the /etc/R folder on the Rocker images:
COPY Rprofile.site /etc/RAs you develop your Shiny app, you will have to occasionally update the Dockerfile
to add manually in any new dependencies. If you forget to do this you will be
reminded by an error the next time you build your Docker image and run your app.
6.9.2 Using the DESCRIPTION File
You have seen how to use remotes::install_local() to install a dependency
from a local directory or a .tar.gz source file. The list of packages to be
installed is determined by the DESCRIPTION file that is at the base of any
package folder. It lists the dependencies of the packages.
Packages listed under the Imports field are installed and needed by the
package. Other packages listed under the Suggests field are needed for
development but are not essential for using the package.
A commonly used hack in the R community is to highjack the package development
tooling to simplify installation of the codebase even if it is
not necessarily structured as a package. The only thing you need for
remotes::install_local() and similar functions to work is the
DESCRIPTION file. You don’t even need all the customary fields like title,
description, or package maintainer in this file.
For the Bananas app, we need shiny, plotly and the e1071 package listed
under Imports. Put this in the DESCRIPTION file:
Imports: e1071, plotly, shinyIn the Dockerfile you need to COPY the DESCRIPTION file into the
file system of the image, then call the remotes::install_deps() function.
The upgrade='never' argument will prevent installing newer versions of existing
packages, thus cutting down unnecessary install time:
FROM rocker/r2u:24.04
COPY app/DESCRIPTION .
RUN R -q -e "remotes::install_deps(upgrade='never')"
[...]You can use the Rprofile.site to specify your preferred repositories.
The remotes functions will respect those settings.
Using the DESCRIPTION file lets you record the dependencies
outside of your Dockerfile. As you develop your Shiny app, you have to update
the DESCRIPTION. When the file changes, Docker will invalidate the cache and
install the dependencies with the new packages included.
6.9.3 Using renv
The renv package (Ushey and Wickham 2024) is a dependency management toolkit for R.
You can create and manage R libraries in your local project and record the state
of these libraries to a lockfile. This lockfile can be used later to restore
the project, thus making projects more isolated, portable, and reproducible.
If you are using renv with your Shiny projects, you are probably already
familiar with the workflow. You can discover dependencies with renv::init()
and occasionally save the state of these libraries to a lockfile with
renv::snapshot(). The nice thing about this approach is that the exact version
of each package is recorded that makes Docker builds reproducible as well.
The renv package has a few different snapshot modes.
The default is called “implicit”. This mode adds the intersection of all
your installed packages and those used in your project as inferred by
renv::dependencies() to the lockfile.
The other mode is called “explicit” snapshot that only captures packages
that are listed in the project DESCRIPTION.
The “custom” model lets you specify filters for modifying the implicit
snapshot, so that you will not end up with the kitchen sink of packages in
your Docker image. Read the Using renv with Docker vignette of renv for
more useful tips.
Once you have the lockfile in your project folder, you can use it like this:
[...]
RUN install.r renv
COPY app/renv.lock .
RUN R -q -e "options(renv.consent=TRUE);renv::restore()"
[...]You have to install renv, copy the renv.lock file over, and use the
renv::restore() command. The renv.consent option gives consent to renv
to write and update certain files.
renv pins the exact package versions in the lockfile. This is necessary for
reproducibility. But full reproducibility is much harder than just the version
of R and the package versions. You have to think about the operating system,
your system dependencies, and even the hardware (Rodrigues 2023).
Exact package versions could take quite long to install. The reason for that is
that binary version of the packages might disappear from the package repositories.
In that case, renv will install it from source and it will need possible
build time dependencies. The older the lockfile gets, the more problematic
it can be to install it without hiccups.
6.9.4 Using deps
renv goes to great lengths to make your R projects perfectly
reproducible. This requires knowing the exact package versions and the
source where it was installed from (CRAN, remotes, local files). This
information is registered in the lock file, which serves as the manifest
for recreating the exact replica of the environment.
Full reproducibility is often required for reports, markdown-based documents, and scripts. These are loosely defined projects combined with strict version requirements, often erring on the side of “more dependencies are safer”.
On the other end of the spectrum, you have package-based development.
This is the main use case for dependency management-oriented packages,
such as remotes and pak.
In this case, exact versions are managed only to the extent of avoiding breaking changes (given that testing can surface these). So what we have is a package-based workflow combined with a “no breaking changes” philosophy to version requirements. This approach often leads to leaner installation.
If you are developing your Shiny app as an R package, then the
package-based development is probably the way to go. You already have a
DESCRIPTION file, so just keep developing.
But what if you are not writing an R package and wanted to combine the best
of both approaches? A loosely defined project with just strict-enough
version requirements without having to manage a DESCRIPTION file.
Why would you need a DESCRIPTION file when you have no R package?
Also, there is a lot that a DESCRIPTION file won’t do for you.
You can manage dependencies with the deps (Sólymos 2024) package by decorating your
existing R code with special, roxygen-style comments. For example, here is
how you can specify a remote, and alternative CRAN-like repository, pin
a package version, or install from a local source:
#' @remote analythium/rconfig@CRAN-v0.1.3
rconfig::config()
#' @repo sf https://r-spatial.r-universe.dev
library(sf)
#' @ver rgl 0.108.3
library(rgl)
#' @local mypackage_0.1.0.tar.gz
library(mypackage)You can exclude development packages with the @dev decorator and list
system requirements following the @sys decorator.
deps helps to find all dependencies from our files using renv::dependencies().
It writes these dependencies into the dependencies.json file, including the
information contained in the comments when using the deps::create() function.
The decorators make your intent explicit, just like if we were writing an
R package. But we do not need to manually write these into a file and
keep it up-to-date. We can just rerun create() to update the JSON
manifest file.
create() crawls the project directory for package dependencies. It
will amend the dependency list and package sources based on the
comments. The other function in deps is install() which looks for the dependencies.json
file in the root of the project directory (or runs create() when the JSON file
is not found) and performs dependency installation according to the
instructions in the JSON file.
Here is the Dockerfile usage where first we install the deps package and
copy the dependencies.json. The next RUN instruction is needed if you
had system requirements specified via @sys. The jq package is used to
parse the JSON and install any of these libraries. Finally, the line with
deps::install() that performs the R package installation based on the JSON file:
[...]
RUN install.r deps
COPY app/dependencies.json .
RUN apt-get update && \
apt-get install -y --no-install-recommends \
jq
RUN apt-get update && \
apt-get install -y --no-install-recommends \
$( jq -r '.sysreqs | join(" ")' dependencies.json )
RUN R -q -e "deps::install()"
[...]The deps package comes with a small command line utility that can be
added to the dockerfile to simplify the installation process:
FROM rocker/r2u:24.04
RUN install.r pak rconfig deps
RUN cp -p \
$(R RHOME)/site-library/deps/examples/03-cli/deps-cli.R \
/usr/local/bin/deps-cli
RUN chmod +x /usr/local/bin/deps-cli
COPY app .
RUN deps-cli all
[...]The deps-cli all command will analyze dependencies and install system and R
dependencies in 1 line. It also looks for the following files before attempting
to auto-detect dependencies in the absence of the dependencies.json:
renv.lock, pkg.lock, and DESCRIPTION. pkg.lock is the lockfile created
by pak.
6.10 Python Requirements
FIXME: Add content here.
- renv https://cran.r-project.org/web/packages/renv/vignettes/python.html
- pip
- Conda, venv? Docker’s purpose is isolation, so multiple venv’s do not make sense in containers according to some posts. Maybe explain that here?
- mention shinylive installs
- how to reuse
.cacheby mounting it: https://testdriven.io/blog/docker-best-practices/#cache-python-packages-to-the-docker-host
6.11 Dynamic Shiny Apps
Dynamic Shiny app require a runtime environment on a host server that can support the HTTP and websocket connections required for R and Python to communicate with the client (Fig. 5.6). Now that we have reviewed Shiny app development and general principles of working with Docker, we can dive into specific examples. We will use the Old Faithful example. You can follow along using the code in the repository at https://github.com/h10y/faithful.
There are many examples organized into folders inside the repo. Consult the
readme file about each of these. In general, we provide Docker images
for the dynamic Shiny app examples in the form of
h10y/faithful/<folder-name>:latest. You can use docker run to pull and
start the Shiny app as:
Visit http://localhost:8080 in your browser to try the app.
6.11.1 R
The simplest containerized app follows the Dockerfile examples for R that you
have seen so far. We provide two Dockerfiles, one for the rocker/r2u and one
for the rhub/r-minimal image within the r-shiny folder. Follow this example
if your Shiny app consists of a single or multiple files. Put those files in the
app folder. Pick your favorite way of specifying your dependencies, and edit the
Dockerfile accordingly. The CMD instruction for this type of setup is
shiny::runApp().
FROM rocker/r2u:24.04
# Add here your dependencies
RUN R -q -e "install.packages('shiny')"
RUN groupadd app && useradd -g app app
WORKDIR /home/app
COPY app .
RUN chown app:app -R /home/app
USER app
EXPOSE 3838
CMD ["R", "-e", "shiny::runApp(host='0.0.0.0', port=3838)"]If your Shiny app is organized as nested files following the structure expected
by the rhino package, check the r-rhino folder for an example.
rhino relies on the renv package for dependency management, so edit the
Dockerfile accordingly. The CMD instruction for a Rhino app is the same as
for the r-shiny setup, because Rhiny uses an app.R file as its entrypoint
that is being recognized by Posit products as a Shiny app. shiny::runApp()
will also recognize it as a Shiny app. The app.R file has a single
command, rhino::app(), that returns a Shiny app object.
If you follow a package based development for your Shiny app, check out the
r-package, r-golem, and r-leprechaun folders for Dockerfile examples.
Here is the r-package example that does not follow any specific framework,
but uses the DESCRIPTION file to define its dependencies that will be picked
up by remotes::install_local(). At the end, we call a function from the package
itself to launch the Shiny app, i.e. faithful::run_app():
FROM rocker/r2u:24.04
RUN groupadd app && useradd -g app app
RUN R -q -e "install.packages('remotes')"
COPY faithful faithful
RUN R -q -e "remotes::install_local('faithful')"
USER app
EXPOSE 3838
CMD ["R", "-e", "faithful::run_app(host='0.0.0.0', port=3838)"]The install.packages('remotes') line is not necessary for the rocker/r2u
image because it comes preinstalled. But we left the line there so that the
Dockerfiles can be used with other parent images that might not have remotes
available.
The Golem and Leprechaun framework based Dockerfiles are slight variations of this. Here is the one with Golem:
[...]
COPY faithfulGolem faithfulGolem
RUN R -q -e "remotes::install_local('faithfulGolem')"
[...]
CMD ["R", "-e", "faithfulGolem::run_app( \
options=list(host='0.0.0.0', port=3838))"]The same with Leprechaun:
6.11.2 Python
The Python version of the app follows similar principles. You can find it in the
py-shiny folder. The parent image is python:3.9, and dependency management
is done via pip and the requirements.txt file. Edit this file as the
starting point for your single or multiple file Python for Shiny apps.
The CMD instruction calls uvicorn to host the app:
FROM python:3.9
# Add here your dependencies
COPY app/requirements.txt .
RUN pip install --no-cache-dir --upgrade -r requirements.txt
RUN groupadd app && useradd -g app app
WORKDIR /home/app
COPY app .
RUN chown app:app -R /home/app
USER app
EXPOSE 3838
RUN mkdir .config
ENV MPLCONFIGDIR=/home/app/.config
ENV HOME=/home/app
CMD ["uvicorn", "app:app", "--host", "0.0.0.0", "--port", "3838"]6.11.3 R Markdown
Hosting R Markdown documents with the runtime: shiny is very similar to hosting
regular Shiny apps. You need pandoc as a system requirement that you can
install with the image operating system’s package manager. The CMD instruction
uses rmarkdown::run() to render and run the document every time a user
connects to it:
FROM rocker/r2u:24.04
RUN apt-get update && \
    apt-get install -y --no-install-recommends \
    pandoc \
    && rm -rf /var/lib/apt/lists/*
RUN R -q -e "install.packages(c('shiny', 'rmarkdown'))"
RUN groupadd app && useradd -g app app
WORKDIR /home/app
COPY app .
RUN chown app:app -R /home/app
USER app
EXPOSE 3838
CMD ["R", "-e", "rmarkdown::run( \
    shiny_args = list(port = 3838, host = '0.0.0.0'))"]
The prerendered option with runtime: shinyrmd require a rendering step
by calling rmarkdown::render() before the final rmarkdown::run()
in the CMD. Note that the RMARKDOWN_RUN_PRERENDER is set to 0 that tells
rmarkdown to not render the document for every user. The HTML is rendered only
once so only the reactive components need to be dealt with:
FROM rocker/r2u:24.04
RUN apt-get update && \
    apt-get install -y --no-install-recommends \
    pandoc \
    && rm -rf /var/lib/apt/lists/*
RUN R -q -e "install.packages(c('shiny', 'rmarkdown', 'deps'))"
RUN groupadd app && useradd -g app app
WORKDIR /home/app
COPY app .
RUN R -q -e "deps::install(ask=FALSE)"
RUN R -e "rmarkdown::render('index.Rmd')"
RUN chown app:app -R /home/app
USER app
EXPOSE 3838
ENV RMARKDOWN_RUN_PRERENDER=0
CMD ["R", "-e", "rmarkdown::run( \
    shiny_args = list(port = 3838, host = '0.0.0.0'))"]
6.11.4 Quarto with R
Using Quarto with R to build and image is conceptually very similar to
R Markdown. First we install quarto. There are many ways of installing it,
this is one option. You need curl to download the Quarto installer,
we use gdebi here to install Quarto from the downloaded .deb package.
Once we have Quarto installed, we remove the Gdebi build time dependency.
FROM rocker/r2u:24.04

RUN apt-get update && apt-get install -y --no-install-recommends \
    pandoc \
    curl \
    gdebi-core \
    && rm -rf /var/lib/apt/lists/*
RUN curl -LO https://quarto.org/download/latest/quarto-linux-amd64.deb
RUN gdebi --non-interactive quarto-linux-amd64.deb
RUN apt-get purge -y gdebi-core && apt-get autoremove -y
RUN install.r quarto shiny deps

RUN groupadd app && useradd -g app app
WORKDIR /home/app
COPY app .

RUN R -q -e "deps::install(ask=FALSE)"

RUN quarto render index.qmd
RUN chown app:app -R /home/app
USER app
EXPOSE 3838
CMD ["quarto", "serve", "index.qmd", "--port", "3838", \
    "--host", "0.0.0.0", "--no-render"]
The prerendering uses quarto render before quarto serve with the
--no-render flag in the CMD instruction at the end.
6.11.5 Quarto with Python
The Python version with Quarto works very similarly, the only difference is the
pip install part based in the requirements.txt file. Otherwise, the Python
code will be COPY-ed over as part of the .qmd file. The rendering and serving
steps are the same:
FROM python:3.9

RUN apt-get update && apt-get install -y --no-install-recommends \
    pandoc \
    curl \
    gdebi-core \
    && rm -rf /var/lib/apt/lists/*
RUN curl -LO https://quarto.org/download/latest/quarto-linux-amd64.deb
RUN gdebi --non-interactive quarto-linux-amd64.deb
RUN gdebi --non-interactive quarto-linux-amd64.deb

COPY app/requirements.txt .
RUN pip install --no-cache-dir --upgrade -r requirements.txt

RUN groupadd app && useradd -g app app
WORKDIR /home/app
COPY app .
RUN quarto render index.qmd
RUN chown app:app -R /home/app
USER app
EXPOSE 3838
CMD ["quarto", "serve", "index.qmd", "--port", "3838", \
    "--host", "0.0.0.0", "--no-render"]
6.11.6 Shiny Server
Shiny Server is part of the rocker/shiny image which is commonly used Docker
parent image for hosting Shiny apps. Shiny Server’s Professional version was
originally the enterprise self hosting option for Shiny apps before Posit
Connect. Nowadays, there is only an Open Source version available.
We will talk about non-containerized Shiny Server as a hosting option later.
A nice feature of a containerized Shiny Server compared to previously discussed options is that it can host multiple Shiny apps, even R, R Markdown, Python, and Quarto apps together in the same container.
FIXME: Provide link to this example.
We’ll use the following setup, combining multiple version of our three
example apps. We include the apps and their version in a hierarchical folder
structure within the apps folder. Besides these files we have an index.html
file in the root of the apps folder which will provide links to the
different apps inside the nested folders. The Dockerfile sits next to the
apps folder:
├── apps
│   ├── bananas
│   │   └── r-shiny
│   ├── faithful
│   │   ├── py-shiny
│   │   ├── quarto-r-shiny
│   │   ├── r-shiny
│   │   └── rmd-shiny
│   ├── lbtest
│   │   ├── py-shiny
│   │   └── r-shiny
│   └── index.html
└── Dockerfile
We use the rocker/shiny:4.4.1 parent image, install pip for Python 3
because we need it to install requirements for the Python Shiny app (pip is
not part of the parent image but you already have Python). We use install2.r
to manually install R package dependencies.
Shiny Server comes with a few apps pre-installed inside the /srv/shiny-server
folder. We remove all these files before we COPY the contents from the apps
directory over to the image. Once all the files are there, we install
R dependencies by relying on the deps packages crawling feature:
deps::install(ask=FALSE) will create a temporary dependencies.json file
based on exploring all the dependencies inside the newly populated
/srv/shiny-server folder. Next we install Python dependencies.
Finally, in CMD we call the executable /usr/bin/shiny-server that will start
the Shiny Server. It will by default listen on port 3838.
FROM rocker/shiny:4.4.1

RUN apt-get update && apt-get install -y \
    --no-install-recommends \
    python3-pip \
    && rm -rf /var/lib/apt/lists/*
RUN install2.r --error --skipinstalled \
    shiny \
    bslib \
    rmarkdown \
    quarto \
    deps
RUN rm -rf /srv/shiny-server/*
COPY ./apps /srv/shiny-server/

RUN R -q -e "deps::install('/srv/shiny-server',ask=FALSE)"
RUN pip install --no-cache-dir --upgrade \
    -r /srv/shiny-server/faithful/py-shiny/requirements.txt

USER shiny
EXPOSE 3838
CMD ["/usr/bin/shiny-server"]
You can build the image and start a container as:
Visit http://localhost:8080 to see the landing page
(Fig. 6.2. Use the links to navigate the
different apps.
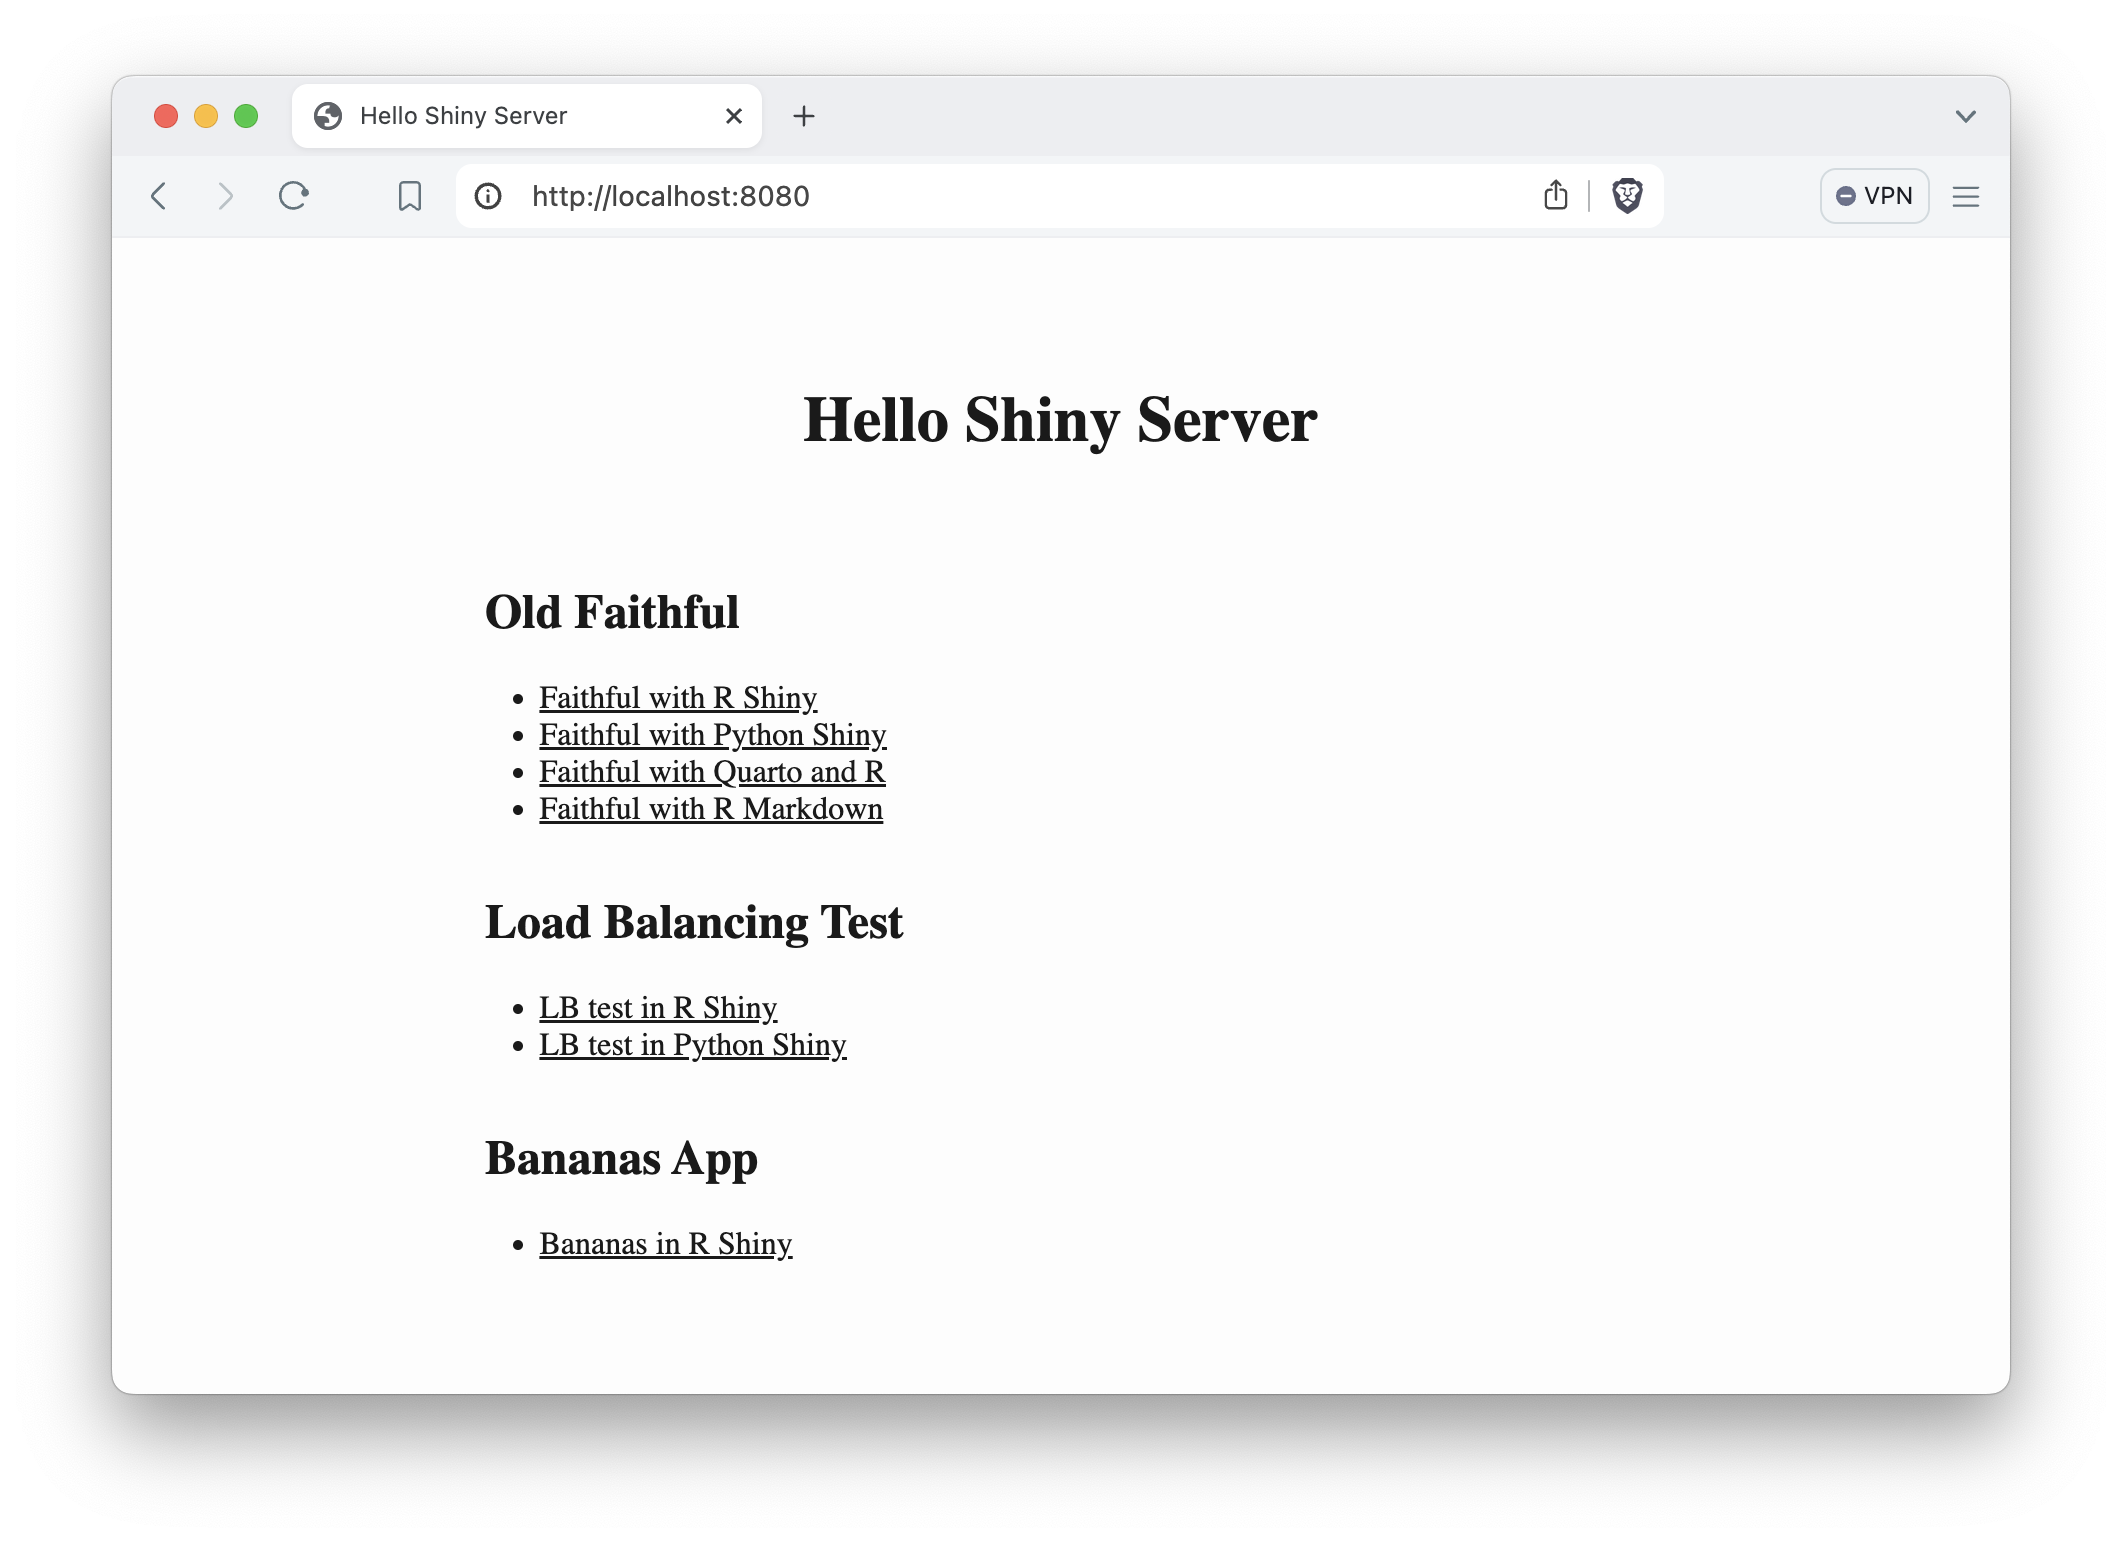
Figure 6.2: Landing page for the containerized Shiny Server deployment.
6.12 Static Shiny Apps
Static Shiny apps can be rendered on your local machine as explained in
5.2.
You’d use shinylive::export("<input-folder>", "<output-folder>") in R and
shinylive export <input-folder> <output-folder> in Python to render the static pages for
Shinylive based on a Shiny app inside the <input-folder> folder.
The Quarto examples that used Shinylive were rendered similarly with the
quarto render <input-file> --output-dir <output-folder> command.
As you saw before, you need to have a proper webserver hosting the pages and the required CSS and JavaScript assets to avoid cross-origin resource sharing (CORS) issues. You can upload the static files to any file hosting service, like GitHub or GitLab Pages, Netlify, or the DigitalOcean App Platform. These platforms all offer a free tier for hosting static assets. The static pages we rendered based on the Old Faithful example are deployed to GitHub Pages at https://h10y.github.io/faithful/. You can also set up your self hosted virtual server in the cloud to host static files, as you will see in later chapters.
Apart from static hosting, it is possible to put the static files in a Docker image behind a server process. This option assumes that you have all the build time requirements for rendering the Shinylive or Quarto with Shinylive documents.
You can use R or Python as well to serve the static contents using
the much bulkier parent images of rocker/r2u or python:3.9. You can use
the httpuv R package or the http.server Python module.
Although this is clearly doable, it is not necessary and will result in a much
larger Docker image. The same outcome can be achieved by using a slimmer parent
image and using a multi-stage Docker build process.
We’ll use the OpenFaaS Watchdog
for static hosting. It is a single binary file that is built for multiple
architectures and is able to serve static assets among other use cases.
It is well suited for containerized deployments because it provides a healthcheck
mechanism and exposes metrics for observability. You may notice in this
example that we have two FROM instructions. The first one takes the
watchdog image, the second one uses a small Alpine linux image.
We COPY the contents from the app folder of the build context to the
/home/app folder of the Alpine image’s file system as we did before.
Then we copy the fwatchdog executable file from the watchdog image as well.
The only thing why the Dockerfile looks a bit verbose is because we want to
create a non-privileged user as we did before to harden our image’s security.
FROM ghcr.io/openfaas/of-watchdog:0.10.1 AS watchdog

FROM alpine:3.20
RUN adduser -D app
USER app
WORKDIR /home/app
COPY app .
COPY --from=watchdog /fwatchdog .
ENV mode="static"
ENV static_path="/home/app"
HEALTHCHECK --interval=3s CMD [ -e /tmp/.lock ] || exit 1
CMD ["./fwatchdog"]
The same Dockerfile would work for all static Shiny output whether that is coming
from Shinylive or Quarto with Shinylive. Just have these files in the app
folder and you are done.
The FROM <image> AS <stage> specification allows us to
later specify which parent image we refer to. This is done via the
--from=<stage> flag for the COPY instruction.
The multiple images used in the same Dockerfile are called stages, and the
a build is referred to as a multi-stage build. It is often used to
use a bulkier image for build purposes and a leaner image to only
copy specific files to. In this case we copy the static contents and an
executable file called watchdog.
The environment variables tell the watchdog process to use the static mode and
that the contents are in the /home/app folder. The HEALTHCHECK specifies that
we should check the existence of the /tmp/.lock file every 3 seconds.
This lockfile is created by the watchdog process and its existence is proof
of a healthy server. When you run your containers using container orchestration
tools like Kubernetes, a failed healthcheck results in
creating a new container and removing the old one.
6.12.1 Multi-stage Builds
A common use case for multi-stage builds is to run the building/rendering process in the first stage of the build, and copy over the results – in our case the static files – from the first stage to the final slimmer image (Fig. 6.3.
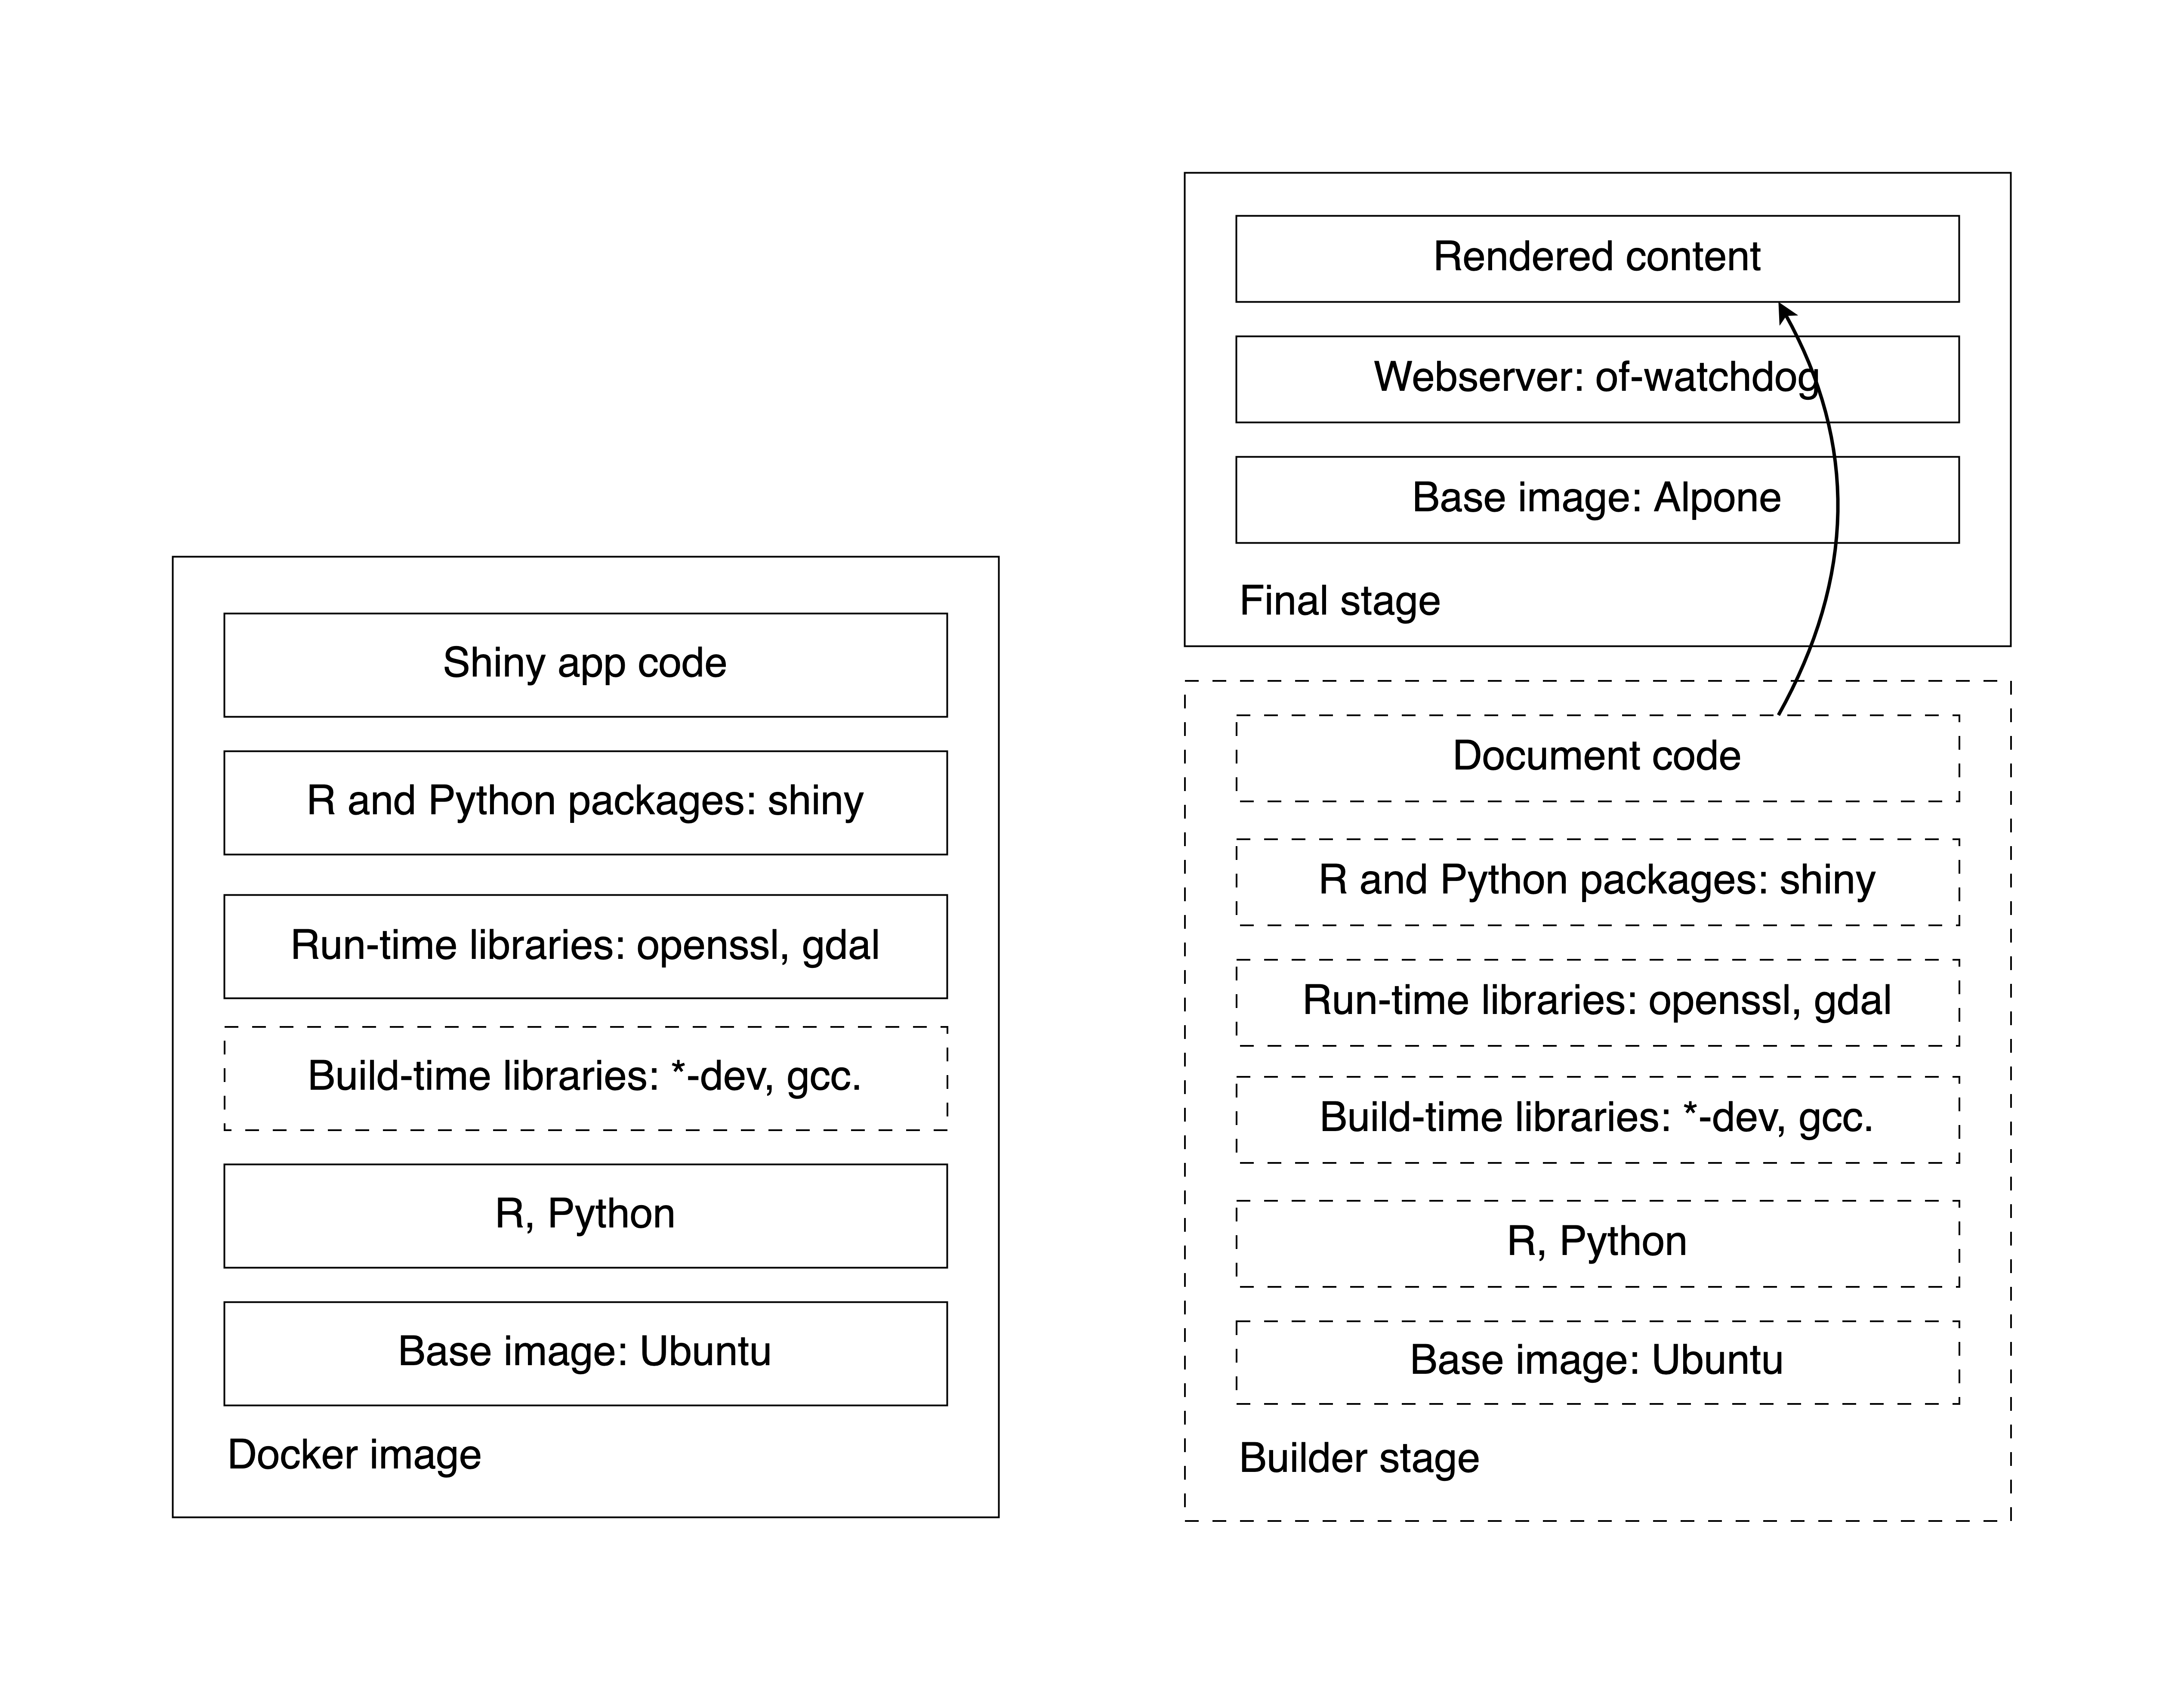
Figure 6.3: Docker layers for single (left) and multi-stage builds (right). Dashed lines are temporary layers.
A Python Shinylive example demonstrates this use case of the multi-stage
build capabilities of Docker. The first stage is called the builder and is
based on the general python:3.9 image. We save the rendered output into the
/root/output folder.
FROM python:3.9 AS builder
WORKDIR /root
RUN pip install shinylive
COPY py-shiny/app app
RUN pip install \
    --no-cache-dir --upgrade -r /root/app/requirements.txt
RUN shinylive export app output
[...]
The same idea works for Quarto with Shinylive:
FROM python:3.9 AS builder
RUN apt-get update && apt-get install -y --no-install-recommends \
    pandoc \
    curl \
    gdebi-core \
    && rm -rf /var/lib/apt/lists/*
RUN curl -LO https://quarto.org/download/latest/quarto-linux-amd64.deb
RUN gdebi --non-interactive quarto-linux-amd64.deb
RUN apt-get purge -y gdebi-core && apt-get autoremove -y
RUN pip install shinylive
WORKDIR /root/app
COPY quarto-py-shinylive/index.qmd /root/app/index.qmd
COPY quarto-py-shiny/app/requirements.txt /root/app/requirements.txt
RUN pip install --no-cache-dir --upgrade -r requirements.txt
RUN quarto add quarto-ext/shinylive --no-prompt
RUN quarto render /root/app/index.qmd --output-dir /root/output
[...]
The R version is slightly different because of the different packages that one has to install. Refer to the previous Quarto examples or the example repository for the corresponding changes.
The second part for the Dockerfile for both the Shinylive and the Quarto
with Shinylive examples (R and Python alike) is the following:
[...]
FROM ghcr.io/openfaas/of-watchdog:0.10.1 AS watchdog

FROM alpine:3.20
RUN adduser -D app
USER app
WORKDIR /home/app
COPY --from=builder /root/output /home/app
COPY --from=watchdog /fwatchdog .
ENV mode="static"
ENV static_path="/home/app"
HEALTHCHECK --interval=3s CMD [ -e /tmp/.lock ] || exit 1
CMD ["./fwatchdog"]
This is identical to the previous example where you had the static files
rendered locally and outside of the Docker image, and then included with
COPY app .. Instead, you have COPY --from=builder /root/output /home/app
here which means: grab the files from the output folder of the build stage.
6.13 Image Analysis
Image analysis is a two part process. First, we extract the Software Bill of Material (SBOM) and other image metadata, these are called attestations. Second, we evaluate these data against vulnerability data from security advisories. Docker Scout can perform image analysis among other things and is available by default for Docker Hub repositories.
Some of these features are experimental and are not universally supported
in all registries, so we won’t cover everything in detail.
You can consult the Docker CLI reference for docker scout.
6.13.1 Attestations
Attestations describe how an image was built, and what it contains. The first kind of attestation is referred to as provenance. You can add the minimum set of provenance information to an image using BuildKit as:
Then you can inspect image provenance information with:
The second kind of attestation is the Software Bill of Material (SBOM).
The SBOM is a complete inventory of a codebase, the license and version information.
The docker scout command can scan images and create an SBOM.
Here is the list view of the SBOM from the rocker/r2u:24.04 image:
docker scout sbom --format list rocker/r2u:24.04

#         Name                       Version                Type
# ------------------------------------------------------------------
#   KernSmooth                2.23-24                       cran
#   MASS                      7.3-61                        cran
#   Matrix                    1.7-0                         cran
#   acl                       2.3.2-1build1                 deb
#   [...]
#   zlib                      1:1.3.dfsg-3.1ubuntu2         deb
#   zlib1g                    1:1.3.dfsg-3.1ubuntu2         deb
#   zlib1g-dev                1:1.3.dfsg-3.1ubuntu2         deb
Write the SBOM information into a JSON file for further processing:
6.13.2 Vulnerability Scanning
Image analysis uses image SBOMs to understand what packages and versions an image contains. Knowing the exact versions of your packages is not only good for reproducibility but is also the foundation for vulnerability scanning. Docker Scout compares the SBOM to a list of known vulnerabilities.
The quick view gives a high level overview of different levels of
vulnerabilities. Vulnerabilities are ordered by severity:
critical (C), high (H), medium (M) or low (L).
There are no critical vulnerabilities known for the rocker/r2u image
and there are 2 vulnerabilities classified as high but no critical vulnerabilities.
docker scout quickview rocker/r2u:24.04

#   ✓ Pulled
#   ✓ Image stored for indexing
#   ✓ Indexed 435 packages
#
#   i Base image was auto-detected. To get more accurate results,
#     build images with max-mode provenance attestations.
#     Review docs.docker.com ↗ for more information.
#
# Target               │  rocker/r2u:24.04 │  0C  2H  206M  44L
#   digest             │  f3272f6d118c     │
# Base image           │  ubuntu:24.04     │  0C  0H    6M   6L
# Refreshed base image │  ubuntu:24.04     │  0C  0H    2M   6L
# Updated base image   │  ubuntu:24.10     │  0C  0H    0M   0L
The CVEs subcommand analyzes an image for vulnerabilities, e.g.
docker scout cves rocker/r2u:24.04.
CVE is short for Common Vulnerabilities and Exposures.
You might want to filter this result to show only critical and high vulnerability
packages.
It is not wise to ignore critical vulnerabilities. In such cases you should find alternatives and not include such packages in your image. Critical vulnerabilities can shake the whole software industry and are usually patched in a short amount of time, or at least a workaround is suggested. Get only critical CVEs as:
docker scout cves --format only-packages --only-vuln-packages \
  --only-severity critical rocker/r2u:24.04

#   ✓ SBOM of image already cached, 435 packages indexed
#   ✓ No vulnerable package detected
#
# Name  Version  Type  Vulnerabilities
Here is how to check for critical and high vulnerabilities:
docker scout cves --format only-packages --only-vuln-packages \
  --only-severity critical,high rocker/r2u:24.04

#   ✓ SBOM of image already cached, 435 packages indexed
#   ✗ Detected 1 vulnerable package with 2 vulnerabilities
#
# Name     Version    Type        Vulnerabilities
# --------------------------------------------------------
# linux  6.8.0-35.35  deb      0C     2H     0M     0L
You can see that the 2 high CVEs are part of Linux itself and are not coming from packages that r2u adds on top of the Ubuntu parent image.
6.14 Containers
You have learnt how to build images using the Dockerfile to contain a Shiny app. A “live” version of this image is called the container, that is the runtime instance of the docker image. Besides the image, it consists of a set of instructions that you specify before or during run time, and an execution environment. Let’s see how you can create, start, and manage Docker containers.
6.14.1 Docker Run
The docker run command is a versatile tool because it can
not only create and run a new container from an image, but it can also pull
the image if needed.
You have seen that we usually set the -p or --port option and map the
host port 8080 to the container port 3838 as e.g. -p 8080:3838.
Setting the port is needed when running a web application, such as Shiny.
This way you can view the application in your browser.
When you start a Docker container it executes a command that you specified
before in the Docker image’s configuration, the Dockerfile.
The default settings from the image usually work well, but you can
also change them if needed.
You may set or override many of the instructions from your Dockerfile:
--exposeexposes a port or a range of ports,--userprovides a username to be used,--workdirsets the working directory inside the container,--entrypointoverwrites the defaultENTRYPOINTinstruction.
It is common to use the --rm flag to automatically remove the container and
its associated anonymous volumes when it exits. This way, when you hit CTRL+C,
it will not only stop the container, but it will also remove it and
docker ps -a will not list it any more. This is best suited for development.
You can provide environment variables through the -e or --env option
or provide a file with the variables using --env-file.
Specifying the platform via --platform is needed when working with different
architectures, such as ARM64 and AMD64.
Setting resources available for the container is possible with the
--cpus (number of CPUs) and setting memory limits by --memory.
Docker containers and their file systems are considered ephemeral, which means they are not expected to persist data for long. Therefore, it is recommended to rely on external storage (databases, object stores) for anything that needs to persist and you do not want it to disappear when the container is deleted.
Docker can persist data on the file system using
bind mounts or volumes.
Bind mounts may be stored anywhere on the host system and you can specify
this via the --mount option in docker run.
Compared to mounts, volumes are stored in a part of the host filesystem
which is managed by Docker and other processes should not modify this part of
the filesystem. You can specify volumes with the --volume option.
Persisting data on the file system is an advanced topic that we’ll see some
examples of later. We mention it here because managing file systems is also
part of the magic of docker run.
One more important flag is the -d or --detach flag. This starts the
container as a background process. You get back your terminal and can start
typing other commands. It can be a good idea to also add a name to the container
so we can find it easier without looking for its ID:
docker run \
  --rm \
  -d \
  -p 8080:3838 \
  --name r-shiny \
  --restart=always \
  ghcr.io/h10y/faithful/r-shiny:latest

docker ps

# CONTAINER ID   IMAGE
# 592caa564860   ghcr.io/h10y/faithful/r-shiny:latest

# COMMAND                    CREATED          STATUS
# "R -e 'shiny::runApp..."   15 seconds ago   Up 14 seconds

# PORTS                    NAMES
# 0.0.0.0:8080->3838/tcp   r-shiny
The docker ps command lists running containers. You see not only the info
we provided with docker run or that were defined in the Dockerfile, but also
for how long the container has been running (time since its creation) and also
the status of the container.
The docker run command is equivalent of first creating a container that
consumes no resources yet with docker create <image-name> and then starting
this container with docker start <container-name-or-id>, but it is much
more convenient to use docker run.
When the container is running in the background, you cannot stop it with CTRL+C.
You have to manage it using the container ID or the container name.
To stop the container, use docker stop <container-name-or-id>.
This will “gracefully” shut down the Shiny app by sending a so called SIGTERM
signal to it. If you use docker kill <container-name-or-id> instead, the process
will be abruptly killed with a so called SIGKILL signal. Try docker stop
first.
None of these commands will remove the container. This means you can start it
again with docker start <container-name-or-id>, or remove it with
docker rm <container-name-or-id>. Notice the subtle difference between
docker rm (remove a container) and docker rmi (remove an image).
Most of the docker commands have aliases, use these if you want to be more
specific, e.g. docker rmi is an alias for docker image rm, whereas
docker rm is an alias for docker container rm.
If for some reason, the container running in the background experiences an issue,
like a unexpected user input, or it runs out of memory, the container will be
stopped by default. If you want a different behavior, use the --restart to
specify a restart policy:
on-failure: restart only if the container exits with a non-zero exit status,unless-stopped: restart the container unless it is explicitly stopped or Docker itself is stopped or restarted,always: the Docker daemon tries to restart the container indefinitely irrespective of the cause.
A non-zero exit status and running out of resources are clear signs of the app not running as expected. You will see in a bit how to troubleshoot using the Docker logs. But in less serious cases, we might not know the “health” of the container without looking at the logs or a user telling us that something is not right. This is where health checks come in. Before we introduce health checks, let’s stop the container:
We used the --rm flag, so the container will be removed after being stopped.
If we haven’t used the --rm flag, we would still see it listed with
docker ps -a.
6.14.2 Health Check
Shiny apps, just like any other web application, can crash for many different reasons. It might be due to a bug in the code, your user might do something unexpected. Or simply, the app runs out of resources. This most often means that it runs out of memory. In these cases, it becomes unresponsive, although the process inside is still running. From a user experience standpoint, an exited process is the same as a non-exited but unresponsive process. From a monitoring perspective, one is easier to detect than the other. The purpose of the health check is to report on the status of our application, so that we know when it is “unhealthy”, which means users cannot access it.
The HEALTHCHECK Dockerfile instruction checks a container’s health on startup.
It is written as HEALTHCHECK <options> CMD <command>.
The options determine how often the health check command is run
(--interval, default is 30s), the timeout duration (--timeout,
default is 30s). If checks take longer than the timeout, it is considered to have
failed.
There is also a start period (--start-period, default is 0s)
After this period there are by default 3 retries (--retries) 5s apart
(--start-interval). The container is not considered unhealth during the set
number of retries. If a health check succeeds during the start period, the
container is considered started.
The health check command’s exit status indicates the health status of the
container. The exit status can be either 0 (healthy) or 1 (unhealthy).
Different commands might return different exit statuses. This is why you often
see the health check command formatted as <command> || exit 1 which will
force any non-0 exit status to be 1.
For web applications, the simplest command would be to see if the main page
responds to a request. If we start the shiny app on port 3838,
the Curl command curl --fail http://localhost:3838 returns the HTML of the
Shiny app or it fails due to the --fail flag (same as -f).
The health check instruction could look like this:
The curl command might or might not be installed in your image. The
ubuntu:24.04 parent image does not ship curl, so you have to add this
to the RUN instructions that install system requirements.
Alternatively, you can use bash (which is available on ubuntu:24.04
but not on alpine:3.20):
This bash command redirects (>) a null value (:) to the TCP port
3838 on the local host, which is available from inside the container.
Let’s try adding a health check to the ghcr.io/h10y/faithful/r-shiny image
and see how we might be able to see the health status. We can add the
command through the --health-cmd option of the docker run:
docker run --rm -d -p 8080:3838 \
  --name healthy \
  --health-cmd="bash -c ':> /dev/tcp/127.0.0.1/3838' || exit 1" \
  ghcr.io/h10y/faithful/r-shiny:latest
Let’s start another container with a health check targeting a different port,
this will cause the check to fail. Note that the healthy container is already
using the 8080 port, we map the unhealthy container to port 8081:
docker run --rm -d -p 8081:3838 \
  --name unhealthy \
  --health-cmd="bash -c ':> /dev/tcp/127.0.0.1/4949' || exit 1" \
  ghcr.io/h10y/faithful/r-shiny:latest
Try docker ps a few times. The status for the healthy image should be (healthy).
The unhealthy image should display (health: starting), which would switch
to (unhealthy) after the start period. You can also access the health status
with the docker inspect command. You’ll need the jq command line tool that
can parse JSON output:
docker inspect --format "{{json .State.Health }}" healthy | jq
# {
#   "Status": "healthy",
#   "FailingStreak": 0,
#   "Log": [
#     {
#       "Start": "2024-07-17T08:29:36.969572509Z",
#       "End": "2024-07-17T08:29:37.0504063Z",
#       "ExitCode": 0,
#       "Output": ""
#     },
#     [...]
# }
The output shows the health check results and the failing streak (how many times
the check has failed in a row). A 0 failing streak is your target.
The same command for the unhealthy container would show a very unhealthy
failing streak:
docker inspect --format "{{json .State.Health }}" unhealthy | jq
# {
#   "Status": "unhealthy",
#   "FailingStreak": 10,
#   "Log": [
#     {
#       "Start": "2024-07-17T08:30:13.47309747Z",
#       "End": "2024-07-17T08:30:13.572182554Z",
#       "ExitCode": 1,
#       "Output": "bash: connect: Connection refused
#         bash: line 1: /dev/tcp/127.0.0.1/4949: Connection refused"
#     },
#     [...]
# }
Health checks can be more complex than pinging the Shiny app endpoint. For example if your application depends on connecting to external databases and APIs, you might want to include multiple checks in a single script file. These can be shell scripts, R, or Python scripts and can also rely on environment variables that contain access tokens during the container run time. You can include this script file in your image and add the corresponding instruction as:
6.14.3 Container Life Cycle
You have seen the some of the possible statuses of containers. Let’s review the container life cycle in a bit more details so that you get a better sense of how to manage containers that are in different states. Figure 6.4 illustrates the container life cycle.
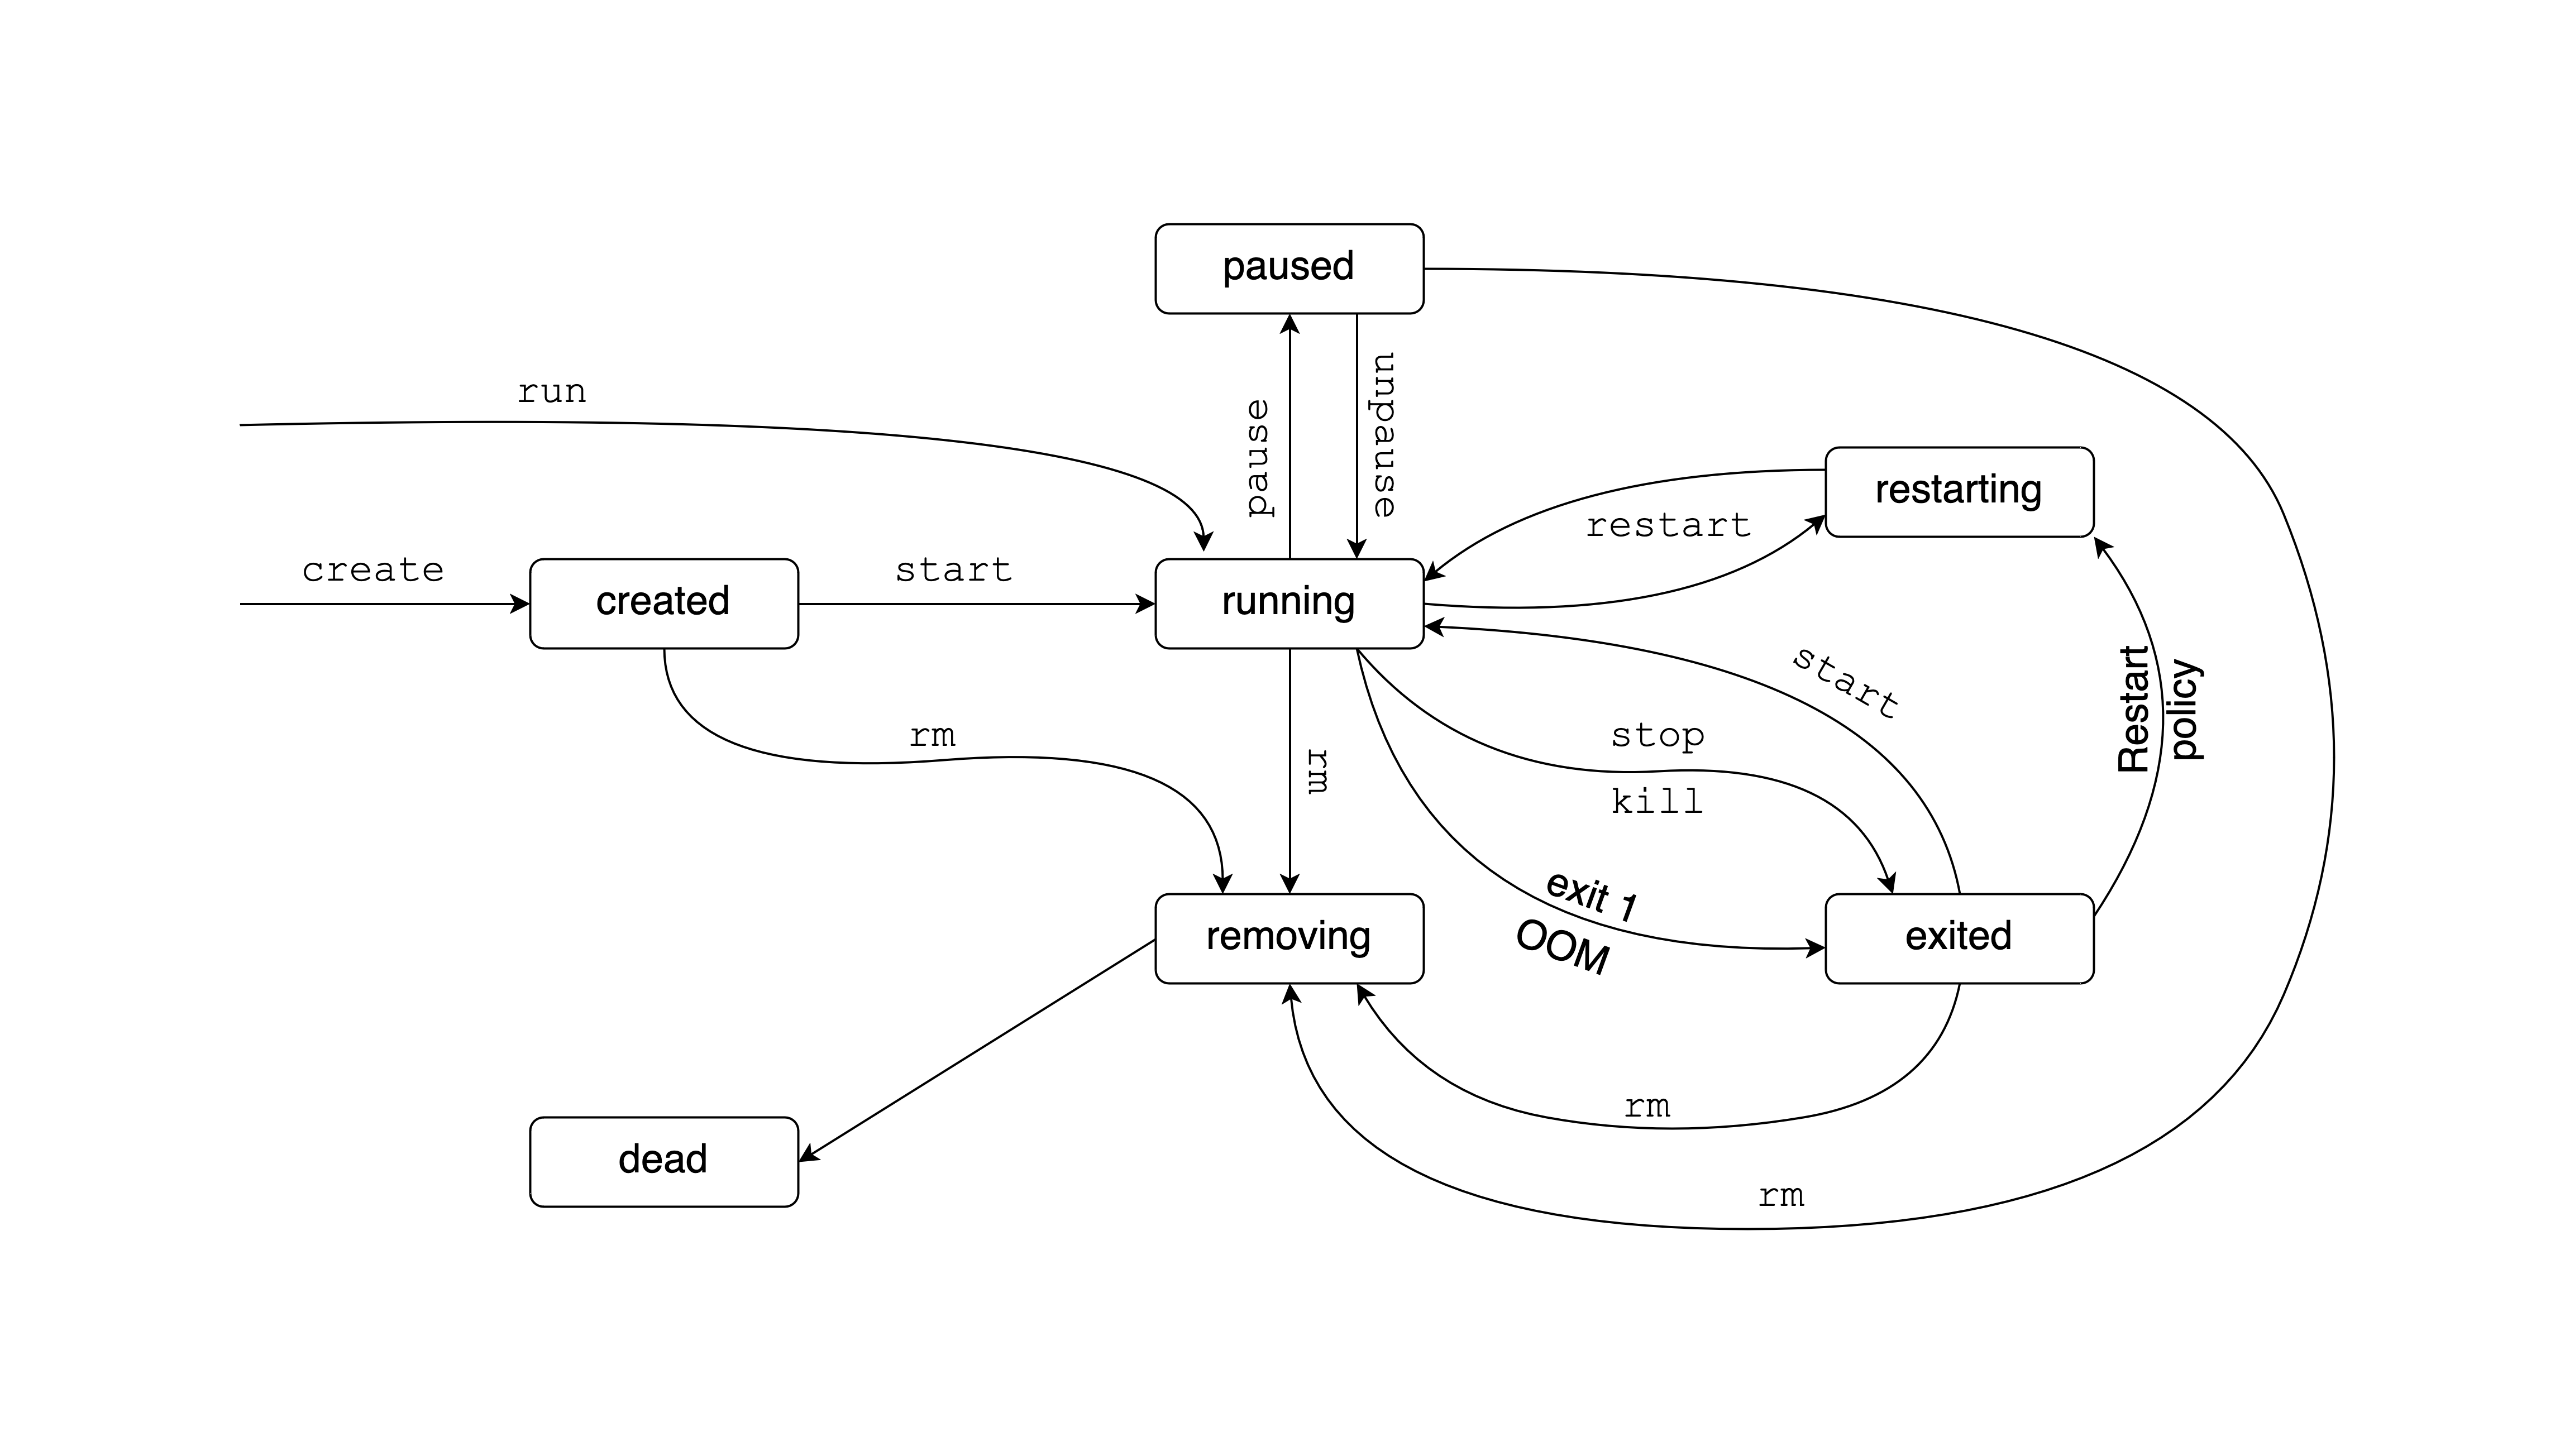
Figure 6.4: The Docker container life cycle.
Containers can be in one of seven states:
created, running, paused, restarting, exited, removing, and dead.
First the container is created, which means it has never been started.
A freshly created container does not yet consumes resources.
After the startup, the container is either running or exited.
An exited status can mean that the container finished its job and exited with
status code 0, or instead of running, the container failed to start and
exited with an error code 1. The exited container does not consumes resources.
A running container is started by either docker start or docker run.
It might have a web server listening to incoming traffic,
as is the case with Shiny. The start is considered successfully if the container
is up for at least 10 seconds and Docker has started monitoring it.
The health check does not immediately affect the
state of the container as long as the main process is running, but the
information might be used by the orchestration service (i.e. Kubernetes)
to decide the fate of the container and replace it with a new instance.
A container that is no longer running enters the exited state.
This might be due to a CTRL+C signal, an exit code of 1. It can be due to the
container running out of resources, for example exceeding the set memory limit.
You can also use the docker stop to stop the container.
When using docker stop, the main process inside the container will receive
a SIGTERM signal, and after a grace period, a SIGKILL.
The docker kill command sends SIGKILL immediately to stop the container.
An exited container can be started again with docker start. It can also
enter the restarting state when the orchestrator tries to restart a failed
container due to a set restart policy. The restart policy will not apply to
containers stopped manually.
A running container can enter the restarting state due to the designated restart
policy or by calling the docker restart command on a running container.
After that, the container will enter the running (or the exited) state.
If you pause a running container with docker pause it will be considered paused.
All processes are suspended for an indefinite time, memory is still allocated
to store the state of the running container, but no CPU resources are used.
You can unpause the container with docker unpause.
You can remove a container with docker rm. You might have to force the removal
of a running container with the --force (or -f) flag. The forced stop will
use SIGKILL, thus is equivalent to first stopping the container with docker kill
and then removing it. The container will be in removing while the container
is in the process of being removed.
After the container is removed it will no longer exist unless there was a problem
with the removal process. For example the container was only partially removed
because resources were kept busy by an external process. Such a “defunct” container
is called a dead container and it cannot be started, restarted, only removed.
You can check the status of the two containers that we were using for
the health check (we called them healthy and unhealthy) as:
docker inspect --format '{{.State.Status}}' healthy
# running

docker inspect --format '{{.State.Status}}' unhealthy
# running
The --format instruction tells Docker to give us only the State related
parts of the overall object returned by the docker inspect command.
Within that list, we are interested in the Status property. This is what the
.State.Status notation means.
There are other interesting properties as part of the State. Status and
Health are two properties that we have seen. But there are others:
docker inspect --format "{{json .State }}" healthy | jq
# {
#   "Status": "running",
#   "Running": true,
#   "Paused": false,
#   "Restarting": false,
#   "OOMKilled": false,
#   "Dead": false,
#   "Pid": 570,
#   "ExitCode": 0,
#   "Error": "",
#   "StartedAt": "2024-07-18T10:20:34.182018084Z",
#   "FinishedAt": "0001-01-01T00:00:00Z",
#   "Health": {
#     "Status": "healthy",
#     "FailingStreak": 0,
#     "Log": [
#       [...]
#     ]
#   }
# }
6.14.4 Managing Containers
Here we summarize the most important commands related to containers.
The docker ps command lists the containers. If you have container
running, you will see those listed with status Up (i.e. running).
docker ps
# CONTAINER ID   IMAGE
# c31e8c365534   ghcr.io/h10y/faithful/r-shiny:latest
# c2a7f34d38bc   ghcr.io/h10y/faithful/r-shiny:latest

# COMMAND                    CREATED          STATUS
# "R -e 'shiny::runApp..."   14 minutes ago   Up 14 minutes (unhealthy)
# "R -e 'shiny::runApp..."   14 minutes ago   Up 14 minutes (healthy)

# PORTS                    NAMES
# 0.0.0.0:8081->3838/tcp   unhealthy
# 0.0.0.0:8080->3838/tcp   healthy
docker container stats displays a live stream of the containers’ resource
usage statistics (hit CTRL+C to exit):
CONTAINER ID   NAME        CPU %     MEM USAGE / LIMIT     MEM %
c8c4dad4e371   unhealthy   0.18%     94.35MiB / 7.657GiB   1.20%
3b44c40aadb7   healthy     0.11%     122MiB / 7.657GiB     1.56%
Use docker logs <container-name-or-id> will print (all) the logs for a
given container. Logs are made up of the container’s STDOUT and STDERR.
To print only the tail of the logs use
docker logs -n 10 <container-name-or-id> that will print the last 10 lines.
To follow the logs in real time, use docker logs -f <container-name-or-id>.
The docker exec command executes a command in a running container.
For example docker exec -it healthy sh will start a shell in the healthy
container we still have running. The -it flag stands for the combination of
--interactive (keep standard input, STDIN, open) and --tty (pseudo
“teletypewriter”) so we can use the shell interactively.
Start poking around, try typing a few commands:
whoamishould returnappas the user name,pwdshould return/home/appas per our Dockerfile instructions,envlists environment variables.
Exit the container’s shell with exit.
To evaluate a command in the container, try
docker exec -it healthy sh -c "whoami".
Let’s stop the containers with docker stop healthy unhealthy (yes, you can
pass an array of container names to docker stop).
You can also stop all running containers with docker stop $(docker ps -q)
and all (running and stopped) containers with docker stop $(docker ps -a -q).
The $(...) shell expression executes the command within the parentheses and
inserts the output and $(docker ps -q) will print out the container IDs.
If you stopped all the containers, you will not see any running containers listed
with docker ps. To see the stopped but not removed containers,
use the docker ps -a command. We started the healthy and unhealthy
containers with the --rm flag, so those were removed after being stopped.
As a result, not even docker ps -a will list them.
Sometimes you need to be able to manage containers because the kill signal
is not properly relayed to the container when using CTRL+C. This happens when
the CMD instruction is provided in shell form
(i.e. CMD R -e "shiny::runApp()" instead of CMD ["R", "-e", "shiny::runApp()"]).
The shell form runs as a child process of /bin/sh -c (default ENTRYPOINT),
and the executable does not receive Unix signals.
If this happens, you need to find a way to stop the container.
These are the most commonly used commands with containers:
docker container stop <container-id>: gracefully stop a running container (wait for the process to stop),docker container start <container-id>: start a stopped container,docker container restart <container-id>: restart a container,docker container rm <container-id>; remove a container,docker container kill <container-id>: kill a container (abruptly terminate the entry point process).
docker container rm --force <container-id> will remove running containers too.
You can make sure the container is removed after CTRL+C if you add the --rm
option to the docker run command and it will automatically remove the container
when it exits.
6.14.5 Docker Compose
You have seen how to manage a single container. But in practice, we often manage multiple containers: multiple replicas of the same app, different applications, and services that help with sending traffic to the right places, collect diagnostic information, provide a layer of security etc.
Managing all this complexity with Docker on a single container basis is going to be a problem. It is not impossible, but it will be difficult and error prone, and as a result less secure.
Docker Compose is a tool for defining and running multi-container applications. Docker Compose is declarative in nature, it uses a single, comprehensible YAML configuration file to define the expected state of your system. The YAML defines the services, networks, and volumes.
Version 1 of the Docker Compose project stopped receiving updates from July 2023. Compose Version 2 is included with any new install of Docker Desktop. Version 2 uses BuildKit, and has continued new-feature development.
You might see commands starting with docker-compose. That used to be the
command for Version 1. It is now an alias for docker compose by default.
It is important to be aware of this historical difference because most examples
that you find online might refer to the use of Version 1 and docker-compose.
We will use the recommended Version 2 and docker compose for our examples
to make this distinction clear.
6.14.6 The Compose File
You will see older tutorials using docker-compose.yml which refers to
Version 1 of Docker Compose. Version 2 still supports this file naming,
but compose.yaml is recommended to make the distinction clear.
Create an empty text file named compose.yaml and copy-pase this into it.
services:
  faithful:
    image: "ghcr.io/h10y/faithful/py-shiny:main"
    ports:
      - "8080:3838"
  bananas:
    image: "ghcr.io/h10y/bananas/r-shiny:main"
    ports:
      - "8081:3838"
    environment:
      - DEBUG=1
FIXME: provide link to the example.
The Compose file specification has several top level elements:
versionis obsolete but can be important for backwards compatibility.nameis a value to override the default project name that is derived from the base name of the project directory.servicesmust be defined, it is the abstract definition of a computing resource within an application that can be “composed” together and modified independently from other components.networksdefines how the services communicate with each other. By default, each container for a service joins the default network and is reachable by other containers.volumesare persistent data stores.
In our simple example we only use services and define two Shiny apps.
You will see more complex examples later.
Services are listed by name, each service is followed by their attributes.
Attributes are very similar to the command line options we saw for docker run.
See the Compose file specification
for all the details.
The compose file can also define a service via a Dockerfile under the
build attribute. The image will be built and started by Compose.
Similarly, you can define the image attribute for pulling the image from a
registry. The ports attribute should look familiar by now. It is used to
define the port mappings between the host machine (left side of the colon)
and the containers (right side of the colon). Notice the
double quotes in the YAML file. Some characters, like * or : have special
meaning in YAML, thus values containing these should be double quoted.
We defined two services, the Python version of the Faithful example and
the R version of the Bananas app. You see environment variables defined for
the bananas service.
6.14.7 Compose Command Line
You can use Docker Compose through the docker compose command of the
Docker Command Line Interface (CLI), and its subcommands.
Let’s review the most important commands. Change your working directory
so that the compose.yaml file is in the root of that folder.
Start all the services defined in your compose.yaml file as:
docker compose up
# [+] Running 10/10
#  ✔ bananas Pulled                                        13.8s
# [...]
#  ✔ faithful Pulled                                        1.0s
# [+] Running 3/3
#  ✔ Network 03-compose_default       Created               0.1s
#  ✔ Container 03-compose-faithful-1  Created               0.3s
#  ✔ Container 03-compose-bananas-1   Created               0.3s
# [...]
# bananas-1   | Listening on http://0.0.0.0:3838
# [...]
# faithful-1  | INFO:     Uvicorn running on http://0.0.0.0:3838 [...]
You’ll see logs appearing in your terminal. First about pulling the images if
those are not yet available, or if a newer version can be found.
Visit http://localhost:8080 to see the Faithful app and
http://localhost:8081 to see the Bananas app.
Hit CTRL+C in the terminal to stop the containers.
Similarly to docker run, we can use the -d (or --detach) flag to start
the containers in the background as docker compose up -d.
You’ll get back your terminal. Use docker compose ls to list currently running
Compose projects:
FIXME: edit the compose project name according to example repo name.
Use docker compose ps to list the containers for the current Compose project:
docker compose ps
# NAME                    IMAGE
# 03-compose-bananas-1    ghcr.io/h10y/bananas/r-shiny:main
# 03-compose-faithful-1   ghcr.io/h10y/faithful/py-shiny:main

# COMMAND                  SERVICE
# "R -e 'shiny::runApp…"   bananas
# "uvicorn app:app --h…"   faithful

# CREATED          STATUS          PORTS
# 11 minutes ago   Up 17 seconds   0.0.0.0:8081->3838/tcp
# 11 minutes ago   Up 17 seconds   0.0.0.0:8080->3838/tcp
Use docker compose logs to get visibility into the logs when containers are
running in detached mode. Logs can grow long. Use the -n option to show the
tail of the logs: docker compose logs -n 10 will show the last 10 lines of the
logs; docker compose logs -n 10 bananas will show the last 10 lines of
the logs for the Bananas app, you have to use the service name as defined in the
YAML configuration. If you want to follow the logs in real time, use
docker compose logs -f for all the logs or docker compose logs -f <service-name>
for a given service. Hit CTRL+C to get back into the terminal.
To poke around in the running containers, use docker compose exec.
docker compose exec bananas sh will give you a shell inside the
container. Let’s type the env command to see the environment variable
DEBUG that we defined in the Compose file:
$ env
# HOSTNAME=4f87a297b85c
# DEBUG=1
# HOME=/home/app
# TERM=xterm
# PATH=/usr/local/sbin:/usr/local/bin:/usr/sbin:/usr/bin:/sbin:/bin
# LANG=en_US.UTF-8
# DEBIAN_FRONTEND=noninteractive
# LC_ALL=en_US.UTF-8
# PWD=/home/app
# TZ=UTC
Type exit to exit the shell. Now let’s suppose that you want to change
the DEBUG variable to 0 to turn off the debugging mode of the app.
Edit the config.yaml file and change the value of 1 to 0. Save your
changes. Type docker compose up -d to apply the changes. This will recreate
the Bananas service:
docker compose up -d
# [+] Running 1/2
#  ✔ Container 03-compose-faithful-1  Running              0.0s
#  ⠏ Container 03-compose-bananas-1   Recreate

# Wait for a few seconds ...

# [+] Running 2/2
#  ✔ Container 03-compose-faithful-1  Running                0.0s
#  ✔ Container 03-compose-bananas-1   Started               10.5s
Type docker compose exec bananas sh -c "env" to list the environment variables.
You should see the new value DEBUG=0.
Stop the containers with docker compose down:
6.14.8 Container Orchestration
Complexity does not stop at managing multiple containers. The number of containers might not stay constant as you might to demand by scaling up and down. You might also want to roll out new versions by causing minimal disruption in the system. Even Docker Compose might be insufficient for use cases at such scale. This is where container orchestration comes in.
Container orchestration makes this complexity manageable for development and operations (DevOps). Container orchestration automates the provisioning, deployment, scaling, and management of containerized applications. It also abstracts away the underlying infrastructure.
Kubernetes is a widely used container orchestration platform. Running Shiny apps with Kubernetes is an advanced topic, but all that you have learnt about containerized application development will be useful if you ever need to use Kubernetes for your production deployment.
6.15 Best Practices
No matter the use case, Docker images start with a parent image. What parent image you use? How do you add new layers to it? These decisions will determine how quickly you can iterate while in development, and the size of the final image you send to production. But it is not only about your experience, but about possible issues that may arise and security implications that might matter even more.
Let’s review best practices for Dockerfiles and building images that apply not only to containerized Shiny app development but to any containerized application and workflow. These will all improve the developer experience and the quality of the final Docker images.
6.15.1 Parent Images
Decide which is the right parent image for the FROM instruction of your image.
The type of the application might dictate this, e.g. R or Python. If you have
fewer dependencies, try using a lean image variant. If you need build time
tools see if a more general and usually larger image is the best starting point.
You might still be able to strip away some fat by leveraging multi-stage builds.
You should also pin the version of your base image. Otherwise, using the
latest image tag might surprise you if you try to rebuild your image
a few years later. Although Linux systems are generally considered very robust,
best practices and the security landscape is evolving constantly. For
example, if you used adduser to create a new non-privileged user in your image
using Ubuntu 22.04 or earlier, it would fail on 24.04 because it has useradd
instead as the recommended function to use. Not a big hurdle, but the
image nevertheless would not build as is because now the latest tag refer to
the latest version.
Pinning the parent image version might also help with other dependencies as well, e.g. in the Rocker versioned stack of images you’ll have a maximum R package version also pinned that was available at the time of the R versioned image.
6.15.2 Minimize Dependencies
Minimizing dependencies is advantageous for many reasons. It results in a smaller final image size, but more importantly, it presents smaller attack surface for malicious actors. Smaller is usually safer. This is especially true when the image is being used as part of client-facing applications on the Internet. Internal tools and dev containers are less of a concern because these cannot be accessed by the public.
Avoid installing “nice to have” packages and do not start from general-purpose parent images aimed at interactive use. Images for Shiny apps and other web services benefit from keeping the images as lean as possible by adding only those R packages and system requirements that are absolutely necessary. You should also uninstall unnecessary build time libraries. Multi-stage builds can be helpful to only include artifacts that are needed.
6.15.3 Cache and Order Layers
When building an image, Docker executes each instruction in the order
specified in the Dockerfile. Docker looks for an existing image in its
cache that it can reuse, rather than creating a new (duplicate) image layer.
Only the instructions RUN, COPY, ADD create layers.
For the RUN instructions the command string from the Dockerfile is used to
find a match from an existing image. For the ADD and COPY instructions,
the contents of the file(s) in the image are examined and a checksum is
calculated for each file, however he last-modified and last-accessed times of
the file(s) are not considered in these checksums.
You can chain RUN instructions to create a single layer. This is especially
important when using apt-get update && apt-get install so that the package
lists will be used to find the most up-to-date candidates to install.
When troubleshooting, use docker run --no-cache <image-name> to disregard the cache.
Caching can be useful is when installing dependencies. Here is a simplified
snippet of a Dockerfile to illustrate cache invalidation:
## Install dependencies
COPY <dependencies> .
RUN <dependency-install-command>

## Copy the app
COPY app .
What would happen if we switched the two blocks?
## Copy the app and <dependencies>
COPY app .

## Install dependencies
RUN <dependency-install-command>
You would have to wait for the build to reinstall all the packages
whenever the app files have changed. This is because once the cache is
invalidated all subsequent Dockerfile commands generate new images
instead of using the cache.
In general, start with the instructions that change less frequently.
Putting your dependencies before the application source code sounds trivial.
But you might have to use parts of your code that define the dependencies
through a lock file, etc. In this case you have to copy the lock file
separately, install dependencies, then copy the rest of the source code
in another COPY instruction.
6.15.4 Switch to Non-root User
By default, Docker containers run as the root user. Root privileges allow unrestricted use which is to be avoided in production. Although you can find lots of examples on the Internet where the container is run as root (Eng and Hindle 2021), this is generally considered bad practice or a “code smell”.
Some parent images come with a non-root user already defined. For example
some of the Rocker images have a non-privileged docker user that you can use.
Otherwise, create a new group and user with something like this:
6.15.5 No Secrets
Avoid hard coding sensitive information into the Dockerfile or the image.
Do not set environment variables with ENV that store passwords or tokens.
Set these at run time with environment variables.
Also do not store such sensitive information in files that you copy.
Add such files to .gitignore and .dockerignore to help prevent
leaking secrets. Here is an example .dockerignore file that will exclude
common files used for storing secrets:
**/.env
**/.aws
**/.ssh
6.15.6 Shell vs. Exec Syntax
Use the exec array syntax for CMD and ENTRYPOINT instructions,
e.g. CMD ["R", "-e", "shiny::runApp()"]. This will ensure that when you
hit CTRL+C to stop the container process it will actually be signalled
properly and you won’t have to abruptly kill the container.
Use the shell syntax only for RUN instructions, e.g.
RUN R -e "install.packages('shiny')".
6.15.7 Log to STDOUT and STDERR
Your apps should writ logs to standard output (STDOUT) and standard error (STDERR) instead of writing these messages to a file. This way you will be able to use standard Docker tools for reding and collecting the logs later.
6.15.8 Include HEALTHCHECK
Use the HEALTHCHECK instruction to determine if the process running in your
container is “healthy” and not just up and running.
6.15.9 Version Your Images
Use timestamps, Git commit hashes, or semantic versioning for your image tags, or a combination of these. You can avoid overwriting existing images and will be able to roll back changes when you send some bugs into production. You can automate this using GitHub actions as you’ll see later.
6.15.10 Readability
Chain commands in your RUN instructions and sort multiline arguments using \.
This will also help in updating your Dockerfile and track the changes with Git.
The difference will be only a line instead of the whole statement.
6.15.11 More Tips
Linters, like Hadolint use many more rules for Dockerfiles that are worth consulting as an extension of this best practices list. Hadolint is also available as a VS Code extension. Here are some other resources that are worth checking out to improve your Dockerfiles and Docker images, and to secure your containerized applications:
6.16 Summary
The use of Docker with other open source software such as R nd Python has been transformative over the past decade (Boettiger and Eddelbuettel 2017; Nüst et al. 2020; Eng and Hindle 2021). You can find examples for almost anything ranging from interactive data science to asychronous APIs in Kubernetes.
With the newfound ability to wrap any Shiny app in a Docker container, you’ll be able to deploy these images to many different hosting platforms. Of course, there is a lot more to learn, e.g. about handling dependencies, persisting data across sessions and containers, and so on. We’ll cover these use cases in due time. Until then, celebrate this milestone, check out further readings, and try to containerize some of your own Shiny apps.
You can also share Docker images with others. This, however, will require the recipient of your app to have Docker installed and be able to run it locally.
In the next Part, we’ll cover options for hosting your app, so that others will only need a browser to be able to access it. No R, Python, or Docker runtime environment is needed on the user’s part. Hosting the app for your users will also be the preferred option in case you do not want to share the source code or the Docker image with the users.
Further reading: